
Difference between revisions of "TP-Link TD-W8951ND Configuration"
m (→Security) |
m |
||
| (15 intermediate revisions by 2 users not shown) | |||
| Line 1: | Line 1: | ||
[[File:TP-Link TD-W8951ND.jpg|thumb| | <div class="ncfrightbox"> {{Template:Modem Links}} </div> | ||
[[File:TP-Link TD-W8951ND.jpg|thumb|left|x250px|The TP-Link 8951ND modem]] | |||
{{Template:Misfortune_Cookie_Upgrade_Firmware}} | |||
= Configure as Router= | |||
This is the procedure NCF uses to configure a TP-Link 8951ND modem out of the box or after a factory reset. To learn more about configuring your particular modem, consult the [[Modem Manuals|manual]]. | |||
# Connect power and turn on the modem with the black button on the back. | # Connect power and turn on the modem with the black button on the back. | ||
| Line 12: | Line 15: | ||
If the modem was previously configured for someone, the password would be the previous user's [[DSL password]]. If it is unknown then do a reset to factory default, using a paper-clip in the reset hole on the back. Hold for 15 seconds to reset. The user name and password will now be as above. | If the modem was previously configured for someone, the password would be the previous user's [[DSL password]]. If it is unknown then do a reset to factory default, using a paper-clip in the reset hole on the back. Hold for 15 seconds to reset. The user name and password will now be as above. | ||
== Using Quick Start Wizard == | |||
{{:Template:Quick Facts (TP-Link DSL modem)}} | |||
# When presented with the TP-Link configuration page, select the '''Quick Start''' option at the top left. | # When presented with the TP-Link configuration page, select the '''Quick Start''' option at the top left. | ||
| Line 26: | Line 32: | ||
# Click '''Next''' | # Click '''Next''' | ||
Continuing now to set the '''user name''' and '''password''' | Continuing now to set the '''user name''' and '''password''' | ||
# PPPoE Service name can remain blank | # PPPoE Service name can remain blank | ||
| Line 45: | Line 50: | ||
# Click '''Next''' to Finish the wizard. | # Click '''Next''' to Finish the wizard. | ||
The modem should now synchronize and connect to your DSL service if the service is operating. You may need to reboot the modem to get it to connect. | |||
=== | ==Security== | ||
# | {{Template:Back_to_the_Top}} | ||
# | |||
## | ===Turn on SPI firewalling=== | ||
# | # In '''Advanced Setup''' select '''Firewall'''. | ||
## | # '''SPI: Enabled''' | ||
## | |||
=== Turn Off UPnP === | |||
# Click on '''Access Management'''. | |||
# Select '''UPnP''' | |||
# Select '''Deactivated''' for UPnP and Auto-Configured. | |||
# Save the changes with '''Save''' | |||
===Deactivate ACL=== | |||
In December 2014 it was revealed that some models of TP-Link modem, including this model, are subject to hacking if they are running out dated firmware and if the remote access (ACL) is set to allow remote access. [[CERT-announced vulnerability of TP-Link modem/router|This web page]] provides more detailed information on the vulnerability. Latest firmware versions can be checked on the [http://www.tp-link.com/us/download/TD-W8961ND.html#Firmware TP-Link website]. | |||
#To be sure your modem is secure, click on By default the '''ACL''' tab will be active. | |||
#Ensure your '''ACL''' page looks like the screen shot below. If not, choose '''WAN''' from the '''Interface''' drop-down box. | |||
#Select '''Deactivated'''. | |||
#Click '''Save'''. | |||
[[File:TP-Link modem with ACL deactivated.jpg|TP-Link modem with ACL deactivated]] | |||
=== | === Protect Admin Role === | ||
# Click on '''Maintenance''' in the menu along the top of the page. Below it other options appear. | # Click on '''Maintenance''' in the menu along the top of the page. Below it other options appear. | ||
# Select '''Administration''' | # Select '''Administration''' | ||
| Line 64: | Line 83: | ||
A pop-up log-in screen appears, and asks for sign-in. Use the User-ID '''admin''' and the DSL-Password just set. Return to the same configure page you were just at. | A pop-up log-in screen appears, and asks for sign-in. Use the User-ID '''admin''' and the DSL-Password just set. Return to the same configure page you were just at. | ||
==Set Daylight Savings Time== | |||
{{Template:Back_to_the_Top}} | |||
# In '''Maintenance''' select '''Time Zone'''. | # In '''Maintenance''' select '''Time Zone'''. | ||
# Daylight Saving: Enabled | # '''Daylight Saving: Enabled''' | ||
== VoIP Enabling== | |||
{{Template:Back_to_the_Top}} | |||
# Launch Telnet session from the computer command line. | |||
# Enter the following commands: | |||
## sys edit autoexec.net (press enter) | |||
## i (when you press i, it means inserting the following commands to the system) | |||
## ip nat service sip sw off (press enter) | |||
## x (press x) | |||
=== | == Final Area Setting and Check== | ||
{{Template:Back_to_the_Top}} | |||
# Click '''Interface Setup''' in the top-of-page menu | # Click '''Interface Setup''' in the top-of-page menu | ||
# Now select '''Wireless''' in the menu below that. | # Now select '''Wireless''' in the menu below that. | ||
| Line 88: | Line 117: | ||
The modem should now synchronize and connect to your DSL service if the service is operating. You may need to reboot the modem to get it to connect. | The modem should now synchronize and connect to your DSL service if the service is operating. You may need to reboot the modem to get it to connect. | ||
=See also= | |||
*[https://www.ncf.ca/ncf/support/w/images/ | *[https://www.ncf.ca/ncf/support/w/images/d/d8/About_Your_TP-Link_TD-W8951ND.pdf About Your TP-Link TD-W8951ND] | ||
*[[:File:CHANGING THE WIRELESS CHANNEL ON TP-LINK TD-8951ND.pdf|Changing Wireless Channels on TP-Link TD-W8951ND]] | |||
*[[CERT-announced vulnerability of TP-Link modem/router]] | *[[CERT-announced vulnerability of TP-Link modem/router]] | ||
*[[Dynamic DNS]] | *[[Dynamic DNS]] | ||
*[[Modem Configuration | *[[Modem Configuration]] - for a complete list of instructions for all NCF modems | ||
*[[Port forwarding]] | *[[Port forwarding]] | ||
*[[VOIP]] | *[[VOIP]] | ||
[[Category: DSL]] | |||
[[Category:DSL]] | |||
[[Category:Modems]] | |||
Latest revision as of 12:29, 26 September 2019

⚠ Vulnerable to Misfortune Cookie: Upgrade Firmware ⚠
In December 2014 it was revealed that some versions of this TP-Link model are subject to hacking if they are running outdated firmware and if the remote access (ACL) is set to allow remote access. We documented this vulnerability on the Misfortune Cookie Vulnerability page.
Read more on the Misfortune Cookie as reported in http://www.kb.cert.org/vuls/id/561444.
NCF Recommendation for this modem:
- Upgrade the Firmware to the lastest version if available.
- Also, Deactivate ACL from Access Management → ACL.
- If there is no firmware update for your version, replace the modem.

TP-Link modem with ACL activated
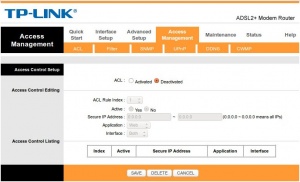
TP-Link modem with ACL deactivated

Configure as Router
This is the procedure NCF uses to configure a TP-Link 8951ND modem out of the box or after a factory reset. To learn more about configuring your particular modem, consult the manual.
- Connect power and turn on the modem with the black button on the back.
- Connect an Ethernet LAN cable to one of the yellow rear ports
- In the browser's address bar, enter the IP address for the modem interface page: 192.168.1.1
- If the modem is fresh from the factory, use the default user name and password to gain access
- user: admin
- password: admin
If the modem was previously configured for someone, the password would be the previous user's DSL password. If it is unknown then do a reset to factory default, using a paper-clip in the reset hole on the back. Hold for 15 seconds to reset. The user name and password will now be as above.
Using Quick Start Wizard
| DSL Quick Configuration Info
(TP-Link DSL modems) | |
|---|---|
| Modem Web Interface | http://192.168.1.1 |
| Modem login | Username: admin
Password: (see 'password' below) |
| VPI / VCI (ADSL) | 0.35 |
| VLAN (VDSL) | 35 |
| Protocol | PPPoE |
| DSL username | (eg. aa999@ncf.ca) |
| DSL Password | Starts with 'ncf' (not the same
as your NCF Start Page login) |
| Firewall | Enabled by default (recommended) |
| Wireless | If enabled, WPA-PSK (WPA2) |
- When presented with the TP-Link configuration page, select the Quick Start option at the top left.
- Select Run Wizard to proceed.
Now a window pops open and you can begin to set up the details of the interface.
- Select Next to proceed
- Set the Time Zone Eastern
- Click Next
- Set the connection type of PPPoE/PPPoA
- Click Next
- Ensure VPI is set to 0 and VCI is set to 35
- Click Next
- Verify that PPPoverEthernet PPPoE is selected
- Click Next
Continuing now to set the user name and password
- PPPoE Service name can remain blank
- PPP username in the form ab123@ncf.ca (NOTE the "@ncf.ca" part! - it will not work without that!)
- PPP Password uses DSL Password (This is not your NCF account password, but your DSL password and was provided to you when you signed up for service, it starts with "ncf...")
- Ensure that the encapsulation remains at PPPoE LLC (default)
- Click Next
Continuing now to set the wireless configuration
- Ensure Access Point indicates activated
- The SSID is set to NCF plus a random number, such as NCF_123456. It is recommended you not use your first or last name, or street address as this information is broadcast and other people in your area will be able to associate the signal with which home it is coming from.
- Broadcast SSID remains selected
- Auth Type - must be set to WPA2-PSK
...wait a moment for it to offer additional field for encryption and password...
- Set Encryption Type to be AES
- Set the Preshared Key to be your DSL-Password
- Click Next to Finish the wizard.
The modem should now synchronize and connect to your DSL service if the service is operating. You may need to reboot the modem to get it to connect.
Security
Turn on SPI firewalling
- In Advanced Setup select Firewall.
- SPI: Enabled
Turn Off UPnP
- Click on Access Management.
- Select UPnP
- Select Deactivated for UPnP and Auto-Configured.
- Save the changes with Save
Deactivate ACL
In December 2014 it was revealed that some models of TP-Link modem, including this model, are subject to hacking if they are running out dated firmware and if the remote access (ACL) is set to allow remote access. This web page provides more detailed information on the vulnerability. Latest firmware versions can be checked on the TP-Link website.
- To be sure your modem is secure, click on By default the ACL tab will be active.
- Ensure your ACL page looks like the screen shot below. If not, choose WAN from the Interface drop-down box.
- Select Deactivated.
- Click Save.

Protect Admin Role
- Click on Maintenance in the menu along the top of the page. Below it other options appear.
- Select Administration
- For the admin user use your DSL-Password or another strong password.
- Enter it once and again below to confirm
- Save the changes with Save
A pop-up log-in screen appears, and asks for sign-in. Use the User-ID admin and the DSL-Password just set. Return to the same configure page you were just at.
Set Daylight Savings Time
- In Maintenance select Time Zone.
- Daylight Saving: Enabled
VoIP Enabling
- Launch Telnet session from the computer command line.
- Enter the following commands:
- sys edit autoexec.net (press enter)
- i (when you press i, it means inserting the following commands to the system)
- ip nat service sip sw off (press enter)
- x (press x)
Final Area Setting and Check
- Click Interface Setup in the top-of-page menu
- Now select Wireless in the menu below that.
- Choose Canada for the Channel Setup
- Click SAVE
Still on this page, Verify:
- The SSID in the form NCF_XXXXX or as you set.
- The Auth Type is WPA2-PSK
- The Encryption Type is AES and key is DSL-Password
- Click on the Internet tab
- Ensure that PVC2 has VPI/VCI set at 0/35
- Ensure that PPPoE credentials are set properly for your user name and password.
The modem should now synchronize and connect to your DSL service if the service is operating. You may need to reboot the modem to get it to connect.
See also
- About Your TP-Link TD-W8951ND
- Changing Wireless Channels on TP-Link TD-W8951ND
- CERT-announced vulnerability of TP-Link modem/router
- Dynamic DNS
- Modem Configuration - for a complete list of instructions for all NCF modems
- Port forwarding
- VOIP