Difference between revisions of "Apple Mail"
Jump to navigation
Jump to search
m |
|||
| (10 intermediate revisions by 3 users not shown) | |||
| Line 1: | Line 1: | ||
These instructions will lead you through setting up Apple Mail for POP/SSL. | These instructions will lead you through setting up Apple Mail for POP/SSL. | ||
To setup for IMAP instead, simply specify IMAP instead of POP, and use port 993 instead of 995 | ==How to Configure Apple Mail== | ||
To setup for IMAP instead, simply specify IMAP instead of POP, and use port 993 instead of 995, otherwise the settings are the same. | |||
* From the Mail menu, select Preferences (or type ⌘+, ). From that window's toolbar, click Accounts. then Account Information (I already have a mail account setup, named myxxx) | * From the Mail menu, select Preferences (or type ⌘+, ). From that window's toolbar, click Accounts. then Account Information (I already have a mail account setup, named myxxx) | ||
* To set up a new mail account, use the settings shown in | * To set up a new mail account, use the settings shown in Screenshot 1 below, substituting your own accountID, password, email address and name. | ||
* Click the Outgoing Mail Server (SMTP) bar, and select Edit SMTP Server list | * Click the Outgoing Mail Server (SMTP) bar, and select Edit SMTP Server list | ||
** Click + to add server information | ** Click + to add server information | ||
** Use the settings on the | ** Use the settings below on the Screenshot 2 | ||
*** Use mail.ncf.ca for the Server Name | *** Use mail.ncf.ca for the Server Name | ||
*** Use 465 for the Server port | *** Use 465 for the Server port | ||
| Line 19: | Line 16: | ||
* Click OK to save your server settings. | * Click OK to save your server settings. | ||
* Click on the Advanced tab, and select the checkbox for Use SSL and select Password authentication as shown on | * Click on the Advanced tab, and select the checkbox for Use SSL and select Password authentication as shown on Screenshot 3 below. | ||
* Close the Accounts window and select Save settings. | * Close the Accounts window and select Save settings. | ||
A note for the security conscious/paranoid: You don't have to store your password in the settings. If you leave the password fields blank, Mail will prompt you to enter your password when it is needed | A note for the security conscious/paranoid: You don't have to store your password in the settings. If you leave the password fields blank, Mail will prompt you to enter your password when it is needed | ||
[[File:AppleMail 01.jpg]] | [[File:AppleMail 01.jpg]] | ||
[[File:AppleMail 02.jpg]] | [[File:AppleMail 02.jpg]] | ||
[[File:AppleMail 03.jpg]] | [[File:AppleMail 03.jpg]] | ||
''Special thanks to NCF member and supporter Dave Gladwin for submitting these instructions.'' | |||
[[Category: Email]] | [[Category: Email]] | ||
[[Category: Apple]] | |||
[[Category:Computer Help]] | |||
Latest revision as of 13:37, 29 October 2018
These instructions will lead you through setting up Apple Mail for POP/SSL.
How to Configure Apple Mail
To setup for IMAP instead, simply specify IMAP instead of POP, and use port 993 instead of 995, otherwise the settings are the same.
- From the Mail menu, select Preferences (or type ⌘+, ). From that window's toolbar, click Accounts. then Account Information (I already have a mail account setup, named myxxx)
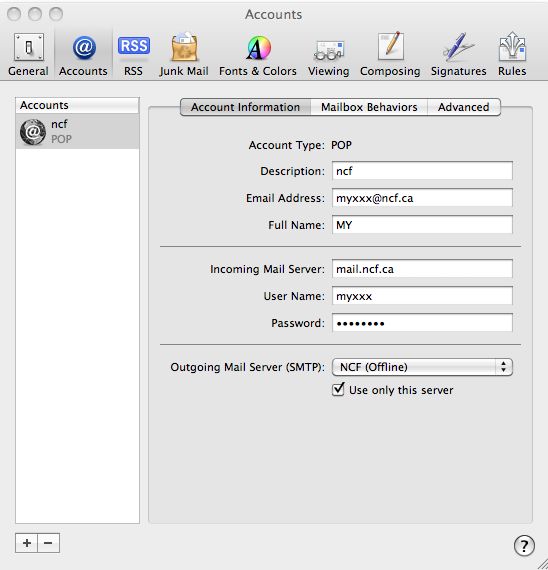
- To set up a new mail account, use the settings shown in Screenshot 1 below, substituting your own accountID, password, email address and name.
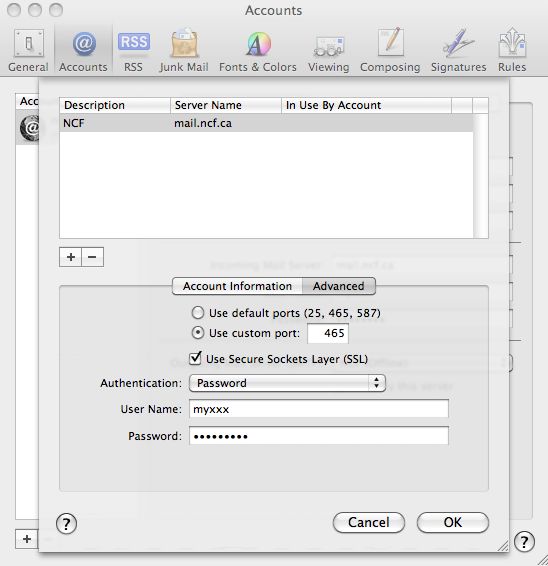
- Click the Outgoing Mail Server (SMTP) bar, and select Edit SMTP Server list
- Click + to add server information
- Use the settings below on the Screenshot 2
- Use mail.ncf.ca for the Server Name
- Use 465 for the Server port
- Select the User Secure Sockets Layer (SSL) checkbox
- For authentication, use Password and fill in the User Name field with your accountID (e.g. ab123) and enter your password in the Password field.
- Click OK to save your server settings.
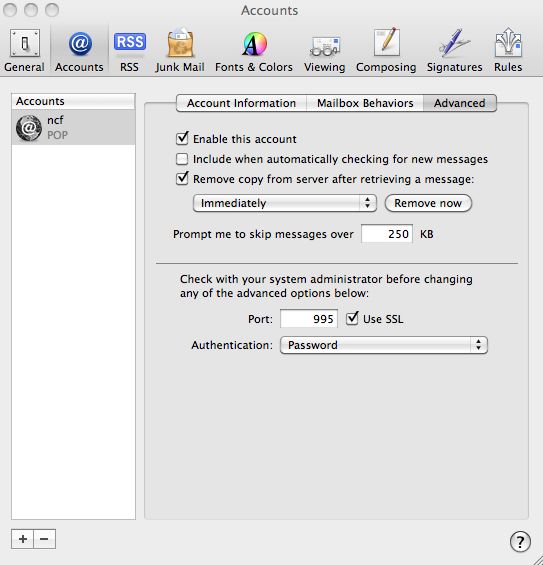
- Click on the Advanced tab, and select the checkbox for Use SSL and select Password authentication as shown on Screenshot 3 below.
- Close the Accounts window and select Save settings.
A note for the security conscious/paranoid: You don't have to store your password in the settings. If you leave the password fields blank, Mail will prompt you to enter your password when it is needed
Special thanks to NCF member and supporter Dave Gladwin for submitting these instructions.


