Difference between revisions of "Changing WiFi Name or Password on SmartRG modems"
(Updated text and images about OvisLink modems) |
m |
||
| Line 24: | Line 24: | ||
|} | |} | ||
1. Using an Ethernet cable plug into one of the yellow '''LAN''' Ports at the back of the OvisLink modem or connect to your wireless network '''NCF_XXXX'''. | 1. Using an Ethernet cable plug into one of the yellow '''LAN''' Ports at the back of the OvisLink modem or connect to your wireless network '''NCF_XXXX'''. | ||
2. Open an Internet browser on your computer and connect to the modem by typing [http://192.168.1.1 192.168.1.1] in the address bar. | 2. Open an Internet browser on your computer and connect to the modem by typing [http://192.168.1.1 192.168.1.1] in the address bar. | ||
| Line 34: | Line 30: | ||
* Username: '''admin''' | * Username: '''admin''' | ||
* Password: Your modem password (Default is '''admin''') | * Password: Your modem password (Default is '''admin''') | ||
[[File:Login Page | [[File:SR505n-Login Page.png|alt=SmartRG Login Page|none|thumb|540x540px|SmartRG modem Login Page]] | ||
'''Changing your WiFi name:''' <br> | '''Changing your WiFi name:''' <br> | ||
4. From the '''Device Info''' page, navigate to '''Wireless''' menu option on the left. | 4. From the '''Device Info''' page, navigate to '''Wireless''' menu option on the left. | ||
Latest revision as of 16:02, 17 April 2024
| Summary of Configuration Information and Changes | |
| Modem Login Page:
Modem Administrator User Name: Modem Administrator Password: |
192.168.1.1
admin NCF Modem Password (Default is admin) |
| Where to go in Menu: | Wireless→ 5 Ghz Band→ Basic or Security
Wireless→ 2.4 Ghz Band→ Basic or Security |
| Changes: |
|
1. Using an Ethernet cable plug into one of the yellow LAN Ports at the back of the OvisLink modem or connect to your wireless network NCF_XXXX.
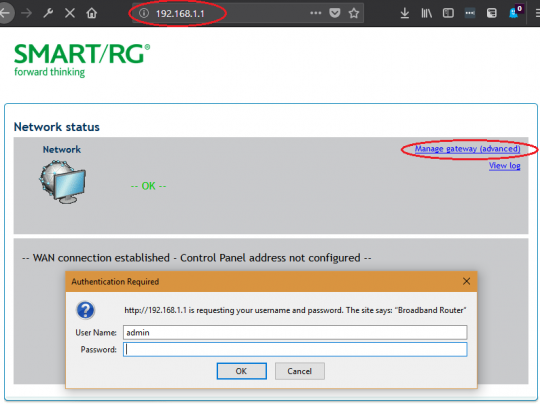
2. Open an Internet browser on your computer and connect to the modem by typing 192.168.1.1 in the address bar.
3. Click on the Manage Gateway(Advanced)” Log in to the Administrative Account:
- Username: admin
- Password: Your modem password (Default is admin)
Changing your WiFi name:
4. From the Device Info page, navigate to Wireless menu option on the left.
5. Click on either the 5 GHz Band or 2.4 GHz Band submenus
6. On the Wireless-- Basic settings page for either the 2.5 or 5 GHz band, change the SSID to the WiFi name to the name of your choice
7. Click Apply/Save at the bottom of the page.
- If you are connected to your modem over WiFi, you may be disconnected at this time. You will need to connect to the new WiFi name with the same WiFi password as before
Changing your WiFi password:
4. From the Device Info page, navigate to Wireless menu option on the left.
5. Click on either the 5 GHz Band or 2.4 GHz Band submenus
6. Click on Security
7. On the Wireless-- Security settings page for either the 2.5 or 5 GHz band, change the WPA passphrase to the password of your choice
- You can check that the password is correct by clicking the Click here to display button which generates a pop up.
8. Click Apply/Save at the bottom of the page.
- If you are connected to your modem over WiFi, you may be disconnected at this time. You will need to re-connect to your WiFi with the new password
Notes:
- You will need to change the 2.4 GHz band and 5 GHz bands independently. If the bands have the same name and password, your device will select the best band at that time. If you are having WiFi interference issues, it may be better to have different names for the 2.4 and 5 GHz bands to test them independently.
See Also
- Modem Configuration - for a complete list of instructions for all NCF modems
- About SmartRG modem lights
- Changing DNS Settings on SmartRG Modems
- Dynamic DNS

