Difference between revisions of "Changing WiFi Channels on SmartRG modems"
m |
m |
||
| Line 21: | Line 21: | ||
· [Channel Width]: Set to [20Mhz] | · [Channel Width]: Set to [20Mhz] | ||
|} | |} | ||
1. Using an Ethernet cable plug into one of the yellow | 1. Using an Ethernet cable plug into one of the yellow '''LAN''' Ports at the back of the SmartRG SR505n modem. Connect to the Network (NCF_XXXX) on your computer. Your computer should indicate an Ethernet connection as opposed to a wireless one. | ||
[[File:SR505n LAN ports.png|alt=SmartRG SR505n LAN ports|none|thumb|360x360px|SmartRG SR505n LAN ports]] | [[File:SR505n LAN ports.png|alt=SmartRG SR505n LAN ports|none|thumb|360x360px|SmartRG SR505n LAN ports]] | ||
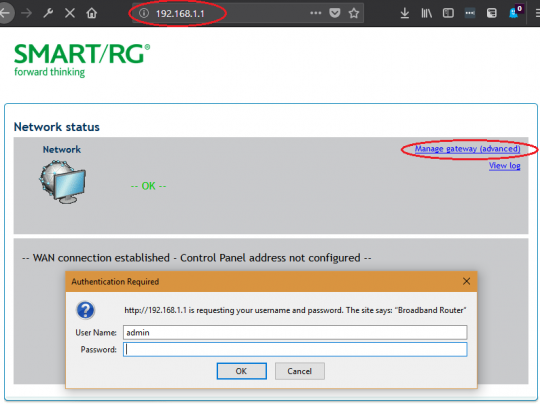
2. Open an Internet browser on your computer | 2. Open an Internet browser on your computer and connect to the modem by typing [http://192.168.1.1 192.168.1.1] in the address bar. | ||
3. Click on the | 3. Click on the '''Manage Gateway(Advanced)'''” Log in to the Administrative Account | ||
* Username: '''admin''' | |||
* Password: Your DSL password (Default is '''password''', if you reset modem) | |||
[[File:SR505n-Login Page.png|alt=SmartRG SR505n Login Page|none|thumb|540x540px|SmartRG SR505n Login Page|link=https://www.ncf.ca/ncf/support/wiki/File:SR505n-Login_Page.png]] | |||
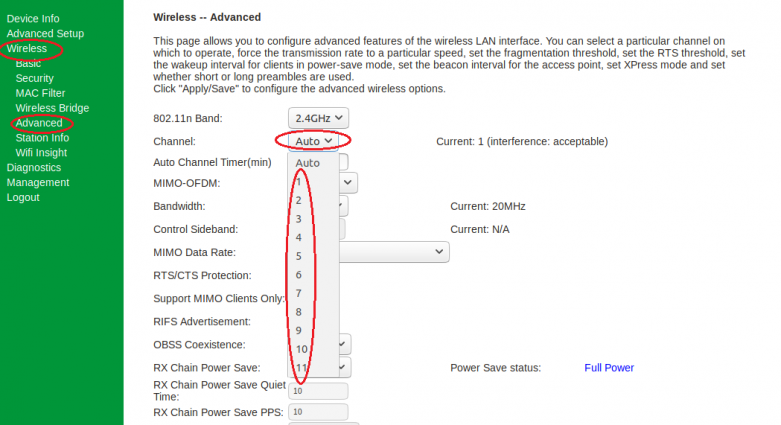
4. From the '''Device Info''' page, navigate to '''Wireless''' menu option on the left. | |||
5. Click on the '''Advanced''' submenu link on the left hand side, under the '''Wireless''' Menu | |||
[[File:SR505n WiFi Channel Selection.png.png|alt=SR505n WiFi Channel Selection|none|thumb|781x781px|SR505n WiFi Channel Selection]] | |||
5. Click on the | 6. On the '''Wireless-- Advanced''' settings page, make the following changes: | ||
* '''Channel:''' Change from '''Auto''' to channel with the least interference as determined by your wireless interference tests. Try 3,4, 8 or 9 | |||
6. On the | 7. Click '''Apply/Save''' at the bottom of the page. | ||
7. Click | |||
Notes: | Notes: | ||
* Wireless channels shouldn't have to be changed often (more than once every 6-12 months). If you find yourself making these changes too frequently, you may have to invest in a mid to high end router with additional channels on the 5Ghz frequency. Contact [mailto:support@ncf.ca support@ncf.ca] for recommendations if needed. | |||
[[Category:DSL]] | [[Category:DSL]] | ||
[[Category:Modems]] | [[Category:Modems]] | ||
Revision as of 12:14, 26 October 2018
| Summary of Configuration Information and Changes | |
| Modem Login Page:
Modem Administrator User Name: Modem Administrator Password: |
192.168.1.1
admin DSL password (Default is password, if you reset modem) |
| Where to go in Menu: | [Wireless] > [Advanced] |
| Changes: | · [Channel]: Switch from [Auto] to Least Congested Channel (Usually 3,4, 8 or 9)
· [Channel Width]: Set to [20Mhz] |
1. Using an Ethernet cable plug into one of the yellow LAN Ports at the back of the SmartRG SR505n modem. Connect to the Network (NCF_XXXX) on your computer. Your computer should indicate an Ethernet connection as opposed to a wireless one.
2. Open an Internet browser on your computer and connect to the modem by typing 192.168.1.1 in the address bar.
3. Click on the Manage Gateway(Advanced)” Log in to the Administrative Account
- Username: admin
- Password: Your DSL password (Default is password, if you reset modem)
4. From the Device Info page, navigate to Wireless menu option on the left.
5. Click on the Advanced submenu link on the left hand side, under the Wireless Menu
6. On the Wireless-- Advanced settings page, make the following changes:
- Channel: Change from Auto to channel with the least interference as determined by your wireless interference tests. Try 3,4, 8 or 9
7. Click Apply/Save at the bottom of the page.
Notes:
- Wireless channels shouldn't have to be changed often (more than once every 6-12 months). If you find yourself making these changes too frequently, you may have to invest in a mid to high end router with additional channels on the 5Ghz frequency. Contact support@ncf.ca for recommendations if needed.


