Difference between revisions of "WiFi Analyzer for MacOS"
m |
m |
||
| Line 6: | Line 6: | ||
1. Holding down the '''Option''' key, click on the '''WiFi''' Icon in the Title Bar. | 1. Holding down the '''Option''' key, click on the '''WiFi''' Icon in the Title Bar. | ||
[[File:MacOS WiFi Analyzer1.png|alt=Wireless Diagnostics Utility on MacOS- Accessing from the Title Bar|none|thumb|527x527px|WiFi menu on MacOS- Accessing from the Title Bar]] | |||
2. Click on '''Open Wireless Diagnostics''', a Wireless Diagnostics Introduction page will open. Ignore it. | 2. Click on '''Open Wireless Diagnostics''', a Wireless Diagnostics Introduction page will open. Ignore it. | ||
[[File:MacOS WiFi Analyzer2.png|alt=Wireless Diagnostics Utility on MacOS- Accessing from the Title Bar|none|thumb|531x531px|Wireless Diagnostics Utility on MacOS- Opening from the WiFi menu]] | |||
3. From the Title Bar, click on the '''Window''' menu and then click on '''Scan''' from the drop down menu. | 3. From the Title Bar, click on the '''Window''' menu and then click on '''Scan''' from the drop down menu. | ||
[[File:MacOS WiFi Analyzer3.png|alt=Wireless Diagnostics Utility on MacOS- Accessing the Scan Window|none|thumb|728x728px|Wireless Diagnostics Utility on MacOS- Accessing the Scan Window]] | |||
4. In the '''Scan''' window, you will find a list of WiFi networks around your premises on the right and a '''Summary''' section on the left. | 4. In the '''Scan''' window, you will find a list of WiFi networks around your premises on the right and a '''Summary''' section on the left. | ||
[[File:MacOS WiFi Analyzer4.png|alt=Wireless Diagnostics utility on MacOS- Scan Window|none|thumb|1084x1084px|Wireless Diagnostics utility on MacOS- Scan Window]] | |||
5. Click on '''Scan Now''' and wait about 5 seconds until the Scan Now button is clickable again. | 5. Click on '''Scan Now''' and wait about 5 seconds until the Scan Now button is clickable again. | ||
6. The '''Summary''' section on the left should be updated with the latest scan results and a '''Best 2.4 GHz''' channel recommendation. The numbers listed as Best 2.4 GHz indicated the channels with the least interference around your premises. | 6. The '''Summary''' section on the left should be updated with the latest scan results and a '''Best 2.4 GHz''' channel recommendation. The numbers listed as Best 2.4 GHz indicated the channels with the least interference around your premises. | ||
[[File:MacOS WiFi Analyzer5.png|alt=Wireless Diagnostics utility on MacOS- Best 2.4 GHz recommendations|none|thumb|556x556px|Wireless Diagnostics utility on MacOS- Best 2.4 GHz recommendations]] | |||
{{Template:WiFi_Analyzer_See_Also}} | {{Template:WiFi_Analyzer_See_Also}} | ||
Latest revision as of 10:59, 3 April 2019
WiFi Analyzers: Windows | Windows 10 | Android | iOS | MacOS | Linux
How to get the recommended channels on 2.4GHz wifi to minimize the effects of WiFi Interference at Your Premises
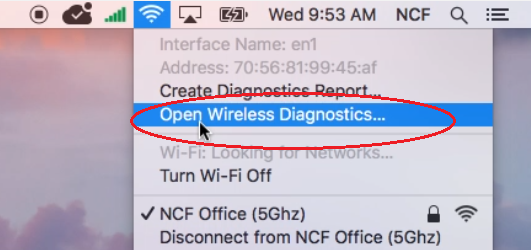
1. Holding down the Option key, click on the WiFi Icon in the Title Bar.
2. Click on Open Wireless Diagnostics, a Wireless Diagnostics Introduction page will open. Ignore it.
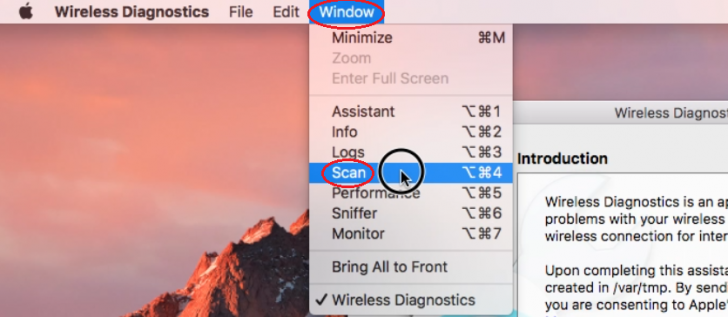
3. From the Title Bar, click on the Window menu and then click on Scan from the drop down menu.
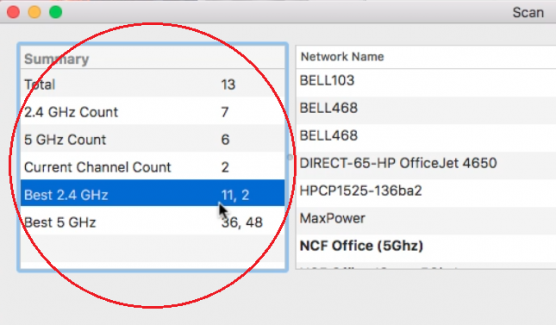
4. In the Scan window, you will find a list of WiFi networks around your premises on the right and a Summary section on the left.
5. Click on Scan Now and wait about 5 seconds until the Scan Now button is clickable again.
6. The Summary section on the left should be updated with the latest scan results and a Best 2.4 GHz channel recommendation. The numbers listed as Best 2.4 GHz indicated the channels with the least interference around your premises.


