Difference between revisions of "Apple Mail"
Jump to navigation
Jump to search
| Line 8: | Line 8: | ||
* From the Mail menu, select Preferences (or type ⌘+, ). From that window's toolbar, click Accounts. then Account Information (I already have a mail account setup, named myxxx) | * From the Mail menu, select Preferences (or type ⌘+, ). From that window's toolbar, click Accounts. then Account Information (I already have a mail account setup, named myxxx) | ||
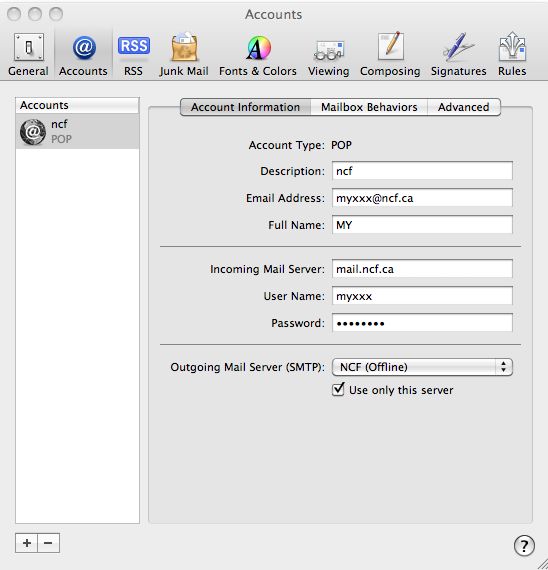
* To set up a new mail account, use the settings shown in [[Client:Apple Mail# | * To set up a new mail account, use the settings shown in [[Client:Apple Mail#Screenshot_1|Screenshot 1]], substituting your own accountID, password, email address and name. | ||
* Click the Outgoing Mail Server (SMTP) bar, and select Edit SMTP Server list | * Click the Outgoing Mail Server (SMTP) bar, and select Edit SMTP Server list | ||
** Click + to add server information | ** Click + to add server information | ||
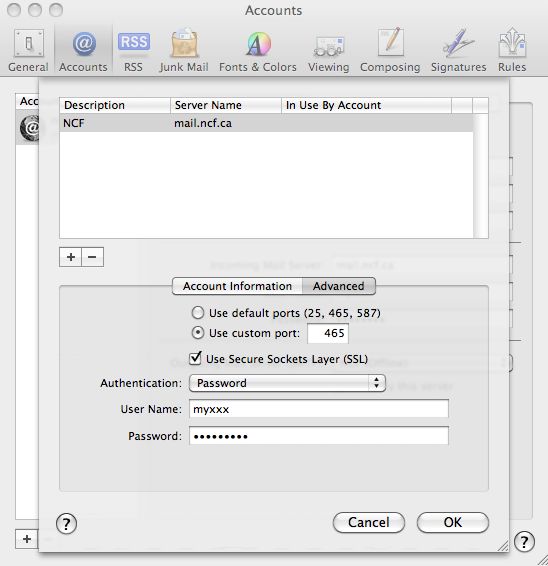
** Use the settings on the [[Client:Apple Mail# | ** Use the settings on the [[Client:Apple Mail#Screenshot_2|Screenshot 2]] | ||
*** Use mail.ncf.ca for the Server Name | *** Use mail.ncf.ca for the Server Name | ||
*** Use 465 for the Server port | *** Use 465 for the Server port | ||
| Line 19: | Line 19: | ||
* Click OK to save your server settings. | * Click OK to save your server settings. | ||
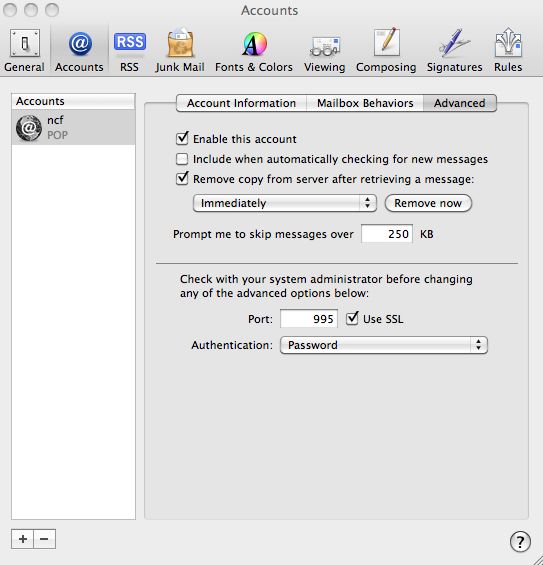
* Click on the Advanced tab, and select the checkbox for Use SSL and select Password authentication as shown on [[Client:Apple Mail# | * Click on the Advanced tab, and select the checkbox for Use SSL and select Password authentication as shown on [[Client:Apple Mail#Screenshot_3|Screenshot 3]] | ||
* Close the Accounts window and select Save settings. | * Close the Accounts window and select Save settings. | ||
A note for the security conscious/paranoid: You don't have to store your password in the settings. If you leave the password fields blank, Mail will prompt you to enter your password when it is needed | A note for the security conscious/paranoid: You don't have to store your password in the settings. If you leave the password fields blank, Mail will prompt you to enter your password when it is needed | ||
== | == Screenshot 1 == | ||
[[File:AppleMail 01.jpg]] | [[File:AppleMail 01.jpg]] | ||
== | == Screenshot 2 == | ||
[[File:AppleMail 02.jpg]] | [[File:AppleMail 02.jpg]] | ||
== | == Screenshot 3 == | ||
[[File:AppleMail 03.jpg]] | [[File:AppleMail 03.jpg]] | ||
Revision as of 15:01, 17 March 2012
How to Configure Apple Mail
These instructions will lead you through setting up Apple Mail for POP/SSL.
To setup for IMAP instead, simply specify IMAP instead of POP, and use port 993 instead of 995.
Otherwise the settings are the same.
- From the Mail menu, select Preferences (or type ⌘+, ). From that window's toolbar, click Accounts. then Account Information (I already have a mail account setup, named myxxx)
- To set up a new mail account, use the settings shown in Screenshot 1, substituting your own accountID, password, email address and name.
- Click the Outgoing Mail Server (SMTP) bar, and select Edit SMTP Server list
- Click + to add server information
- Use the settings on the Screenshot 2
- Use mail.ncf.ca for the Server Name
- Use 465 for the Server port
- Select the User Secure Sockets Layer (SSL) checkbox
- For authentication, use Password and fill in the User Name field with your accountID (e.g. ab123) and enter your password in the Password field.
- Click OK to save your server settings.
- Click on the Advanced tab, and select the checkbox for Use SSL and select Password authentication as shown on Screenshot 3
- Close the Accounts window and select Save settings.
A note for the security conscious/paranoid: You don't have to store your password in the settings. If you leave the password fields blank, Mail will prompt you to enter your password when it is needed
Screenshot 1
Screenshot 2
Screenshot 3
Special thanks to NCF member and supporter Dave Gladwin for submitting these instructions.


