Difference between revisions of "Cable test page"
(I added wifi information) |
(bandsteering) |
||
| Line 160: | Line 160: | ||
[[File:Wifi1.png|left|thumb|701x701px]] | [[File:Wifi1.png|left|thumb|701x701px]] | ||
| Line 180: | Line 182: | ||
Ping test and traceroute are useful for validating the status of a networked device. It can also assist in detecting latency, routing, or congestion issues between two devices communicating over a network. | Ping test and traceroute are useful for validating the status of a networked device. It can also assist in detecting latency, routing, or congestion issues between two devices communicating over a network. | ||
'''<u>Ping test</u>''' | === '''<u>Ping test</u>''' === | ||
Login to the modem using a web Interface | Login to the modem using a web Interface | ||
| Line 208: | Line 209: | ||
==== '''<u>Traceroute</u>''' ==== | |||
'''<u>Traceroute</u>''' | |||
| Line 242: | Line 242: | ||
==== '''<u>Modem Logs</u>''' ==== | |||
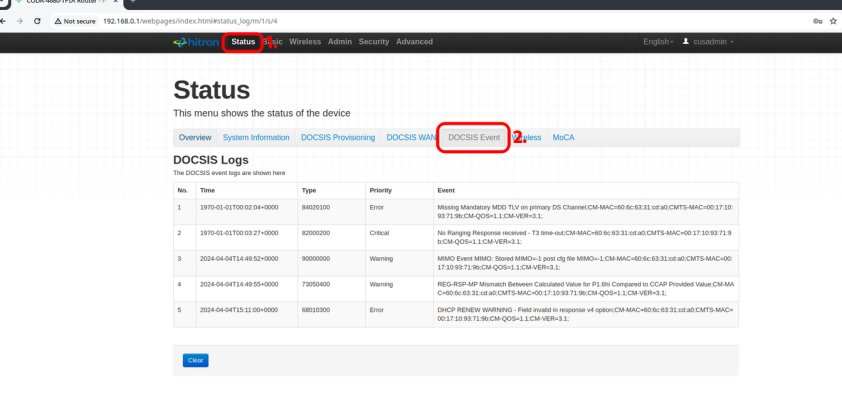
Help desk will occasionally request screenshots of their modem logs. These logs provide a clearer insight of what is happening with your modem. Follow the steps below: | Help desk will occasionally request screenshots of their modem logs. These logs provide a clearer insight of what is happening with your modem. Follow the steps below: | ||
| Line 278: | Line 280: | ||
== DNS == | == DNS == | ||
==== '''<u>How to change your DNS settings</u>''' ==== | |||
'''<u>How to change your DNS settings</u>''' | |||
| Line 334: | Line 335: | ||
= Troubleshooting Wi-Fi = | == Troubleshooting Wi-Fi == | ||
Most problems with Wi-Fi are a result of interference from other wireless or electronic devices, or signal strength problems (e.g., due to obstructions or distance). | Most problems with Wi-Fi are a result of interference from other wireless or electronic devices, or signal strength problems (e.g., due to obstructions or distance). | ||
== '''Signal Strength problems''' == | === '''<u>Signal Strength problems</u>''' === | ||
| Line 344: | Line 345: | ||
Large appliances, such as refrigerators, can block Wi-Fi signals if the appliance is between your device and the modem. This can sometimes be resolved easily by moving you and/or your device from one part of the room to another. If your home is large and you are just running out of Wi-Fi range, then a Wi-Fi mesh home system or Wifi extenders may be required. These can be purchased from NCF, and are placed around your home to extend the Wi-Fi range to other areas. | Large appliances, such as refrigerators, can block Wi-Fi signals if the appliance is between your device and the modem. This can sometimes be resolved easily by moving you and/or your device from one part of the room to another. If your home is large and you are just running out of Wi-Fi range, then a Wi-Fi mesh home system or Wifi extenders may be required. These can be purchased from NCF, and are placed around your home to extend the Wi-Fi range to other areas. | ||
== '''<u>Common Fixes For WiFi</u>''' == | |||
=== '''<u>Changing WiFi Channels on CODA-4680</u>''' === | |||
= '''Changing WiFi Channels on CODA-4680''' = | |||
Changing the wifi channels for 2.4 bandwidth | Changing the wifi channels for 2.4 bandwidth | ||
Connect to your modem using a wired Ethernet cable or join your Wireless network | Connect to your modem using a wired Ethernet cable or join your Wireless network | ||
| Line 365: | Line 366: | ||
Step 3 | Step 3 | ||
Click on '''wireless''' choose '''basic settings''' should already be selected '''2.4''' tab will be selected by default. | Click on '''wireless''' choose '''basic settings''' should already be selected '''2.4''' tab will be selected by default. | ||
Step 4 | Step 4 | ||
Change the '''channel bandwidth''' switch 20/40 MHz to 20MH | Change the '''channel bandwidth''' switch 20/40 MHz to 20MH | ||
| Line 374: | Line 377: | ||
Change the '''wireless channel''' from auto to any of the channels in the drop down menu | Change the '''wireless channel''' from auto to any of the channels in the drop down menu | ||
| Line 379: | Line 383: | ||
After selecting a channel '''save changes''' | After selecting a channel '''save changes''' | ||
==== '''<u>Band steering</u>''' ==== | |||
When connecting a device to your home network, most WiFi modems prompt you to choose between two frequencies: 2.4 GHz or 5 GHz.Band steering automatically connects your devices to the most appropriate WiFi frequency in your home. | |||
Steps to enable band steering | |||
Step 1 | |||
Connect to your modem using a wired Ethernet cable or join your Wireless network | |||
Login to the modem using a web Interface | |||
Enter <nowiki>http://192.168.0.1</nowiki> into the address bar in your web browser '''Chrome''', '''Firefox''' or '''Safari''' | |||
Step 2 | |||
You will be asked to enter username: '''cusadmin''' and password:<'''the Wi-Fi network password that you configured in the Quick Setup>''' | |||
Step 3 | |||
* Click on '''wireless''' | |||
* Click on the '''Advanced''' tab | |||
* Ensure that the Band streeting is '''Enable''' | |||
* Click '''save changes''' | |||
==== <u>Disabling Bandsteering</u> ==== | |||
When Band Steering is disabled, you can create two separate networks (or SSIDs), each with its own password and name. You can then connect specific devices to a specific network, either 2.4 or 5G. | |||
'''Steps to disabling bandsteering''' | |||
'''Step 1''' | |||
Login to the modem using a web Interface | |||
* Enter <nowiki>http://192.168.0.1</nowiki> into the address bar in your web browser '''Chrome''', '''Firefox''' | |||
'''Step 2''' | |||
You will be asked to enter username: '''cusadmin''' and password:<'''the Wi-Fi network password that you configured in the Quick Setup'''> | |||
'''Step 3''' | |||
* Click on '''wireless''' | |||
* Click on the '''Advanced''' tab | |||
* Ensure that the Band streeting is '''Disabled''' | |||
* Click '''save changes''' | |||
Revision as of 15:32, 5 June 2024
Common fixes for Cable modems
If the modem's @ light is on but there is no internet, try power cycling it.
- To perform a power cycle, unplug your modem from the wall for a duration of 30 seconds.
In the event that the @ light is off and the ⬇️ downstream light or ⬆️ upstream light is flashing try:
- Disconnect and reconnect the coaxial cable at the back, making sure it is securely attached.
If the first two methods do not work, perform a factory reset.
Factory Reset
When you perform a factory reset, the CODA-4680 returns to default settings, losing all user-configured settings and returning the modem to its initial configuration state.
Method One
Your device will need to be connected to your modem by WiFi or an Ethernet cable plugged into one of the CODA-4680 modem's LAN ports.
- Open a web browser Chrome, Firefox of Safari and enter http://192.168.0.1 into the address bar then press enter.
- A login screen for the Hitron CODA-4680 will appear. The default username and password are case-sensitive.
- Username: cusadmin
- Password <the Wi-Fi network password that you configured in the Quick Setup>
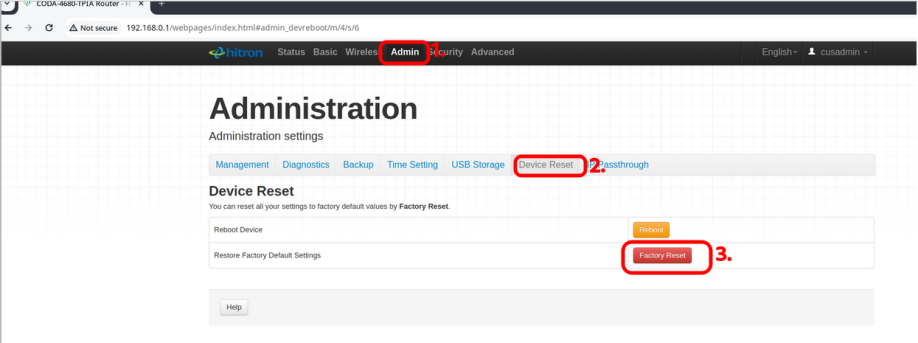
Select Admin, choose Device Reset tab, and select the Factory Reset button.
Method Two
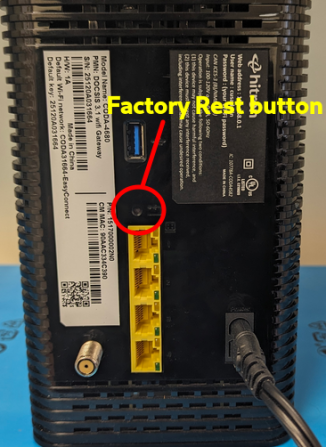
Using a pin or pencil tip, press and hold the RESET button at the back of the modem for at least 30 seconds, it will take about 5 to 10 minutes for the CODA-4680 to reboot its self.
Once the modem has rebooted its self which will take 5 to 10 minutes, If using wifi connect a device to the modem's EasyConnect Wi-Fi network. The EasyConnect Wi-Fi network only connects your device to the modem, it will not connect your device to the internet. The EasyConnect Wi-Fi network name and password is specific to your modem, and can be found on the label on the back of the modem. It takes the form of:
Default Wi-Fi Network: CODAXXXXX-EasyConnect (XXXXX is a series of numbers)
Default key: ZZZZZZZXXXXX (a series of numbers)
- Open up a web browser on the device you connected to the modem, and browse to any website.
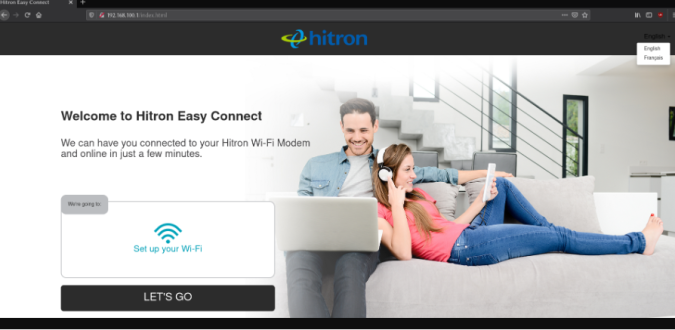
- The Hitron EasyConnect Quick Setup screen should automatically load in your web browser. If it does not, enter 192.168.0.1 in your web browser's URL bar to load the Hitron EasyConnect Quick Setup manually.
- To begin the Quick Setup, select Let's Go
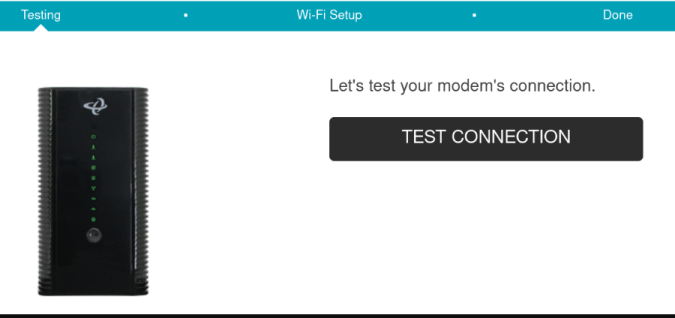
Select Test Connection to test the modem's internet connection
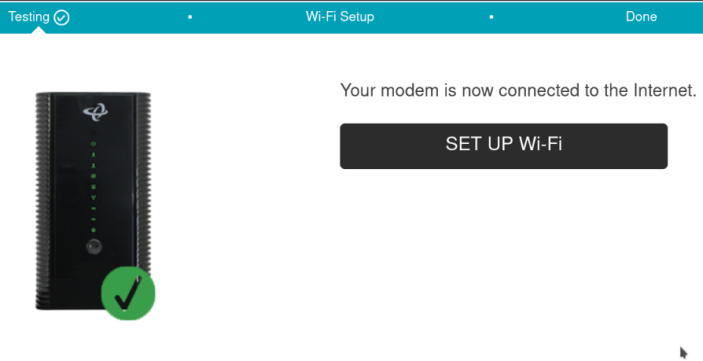
If the test is successful, the Quick Setup will confirm that your modem is connected to the internet. Select Setup Wi-Fi to configure the Wi-Fi network name and password you wish to use. If the test is not successful, you will not be able to provide with the Quick Setup. Check the light pattern on the Hitron COD-4680, or turn it off, reconnect the coaxial cable, and try the Quick Setup again.
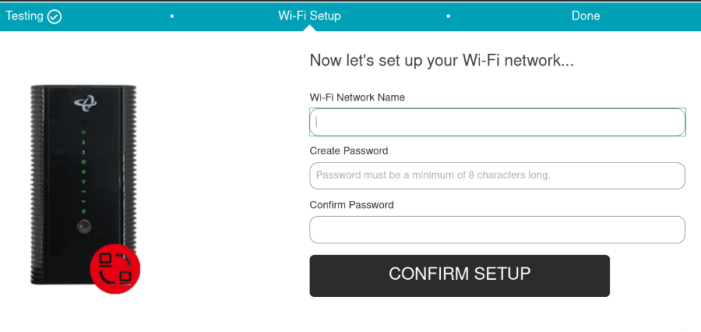
Enter the Wi-Fi Network Name and Password you wish to use to connect to the internet. Re-enter the password to Confirm Password, and select Confirm Setup:
Information Gathering
Ping test and traceroute are useful for validating the status of a networked device. It can also assist in detecting latency, routing, or congestion issues between two devices communicating over a network.
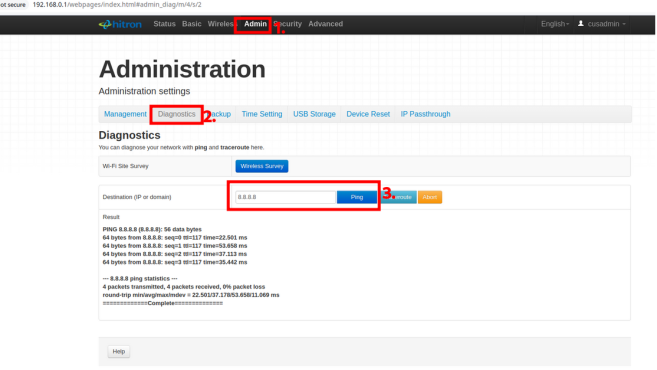
Ping test
Login to the modem using a web Interface
1.Enter http://192.168.0.1 into the address bar in your web browser Chrome, Firefox or Safari.
2.You will be asked to enter username: cusadmin and password:<the Wi-Fi network password that you configured in the Quick Setup>
3. Select Admin choose Diagnostics, in the destination (IP or domain) section type 1.1.1.1 or cloudflare.com
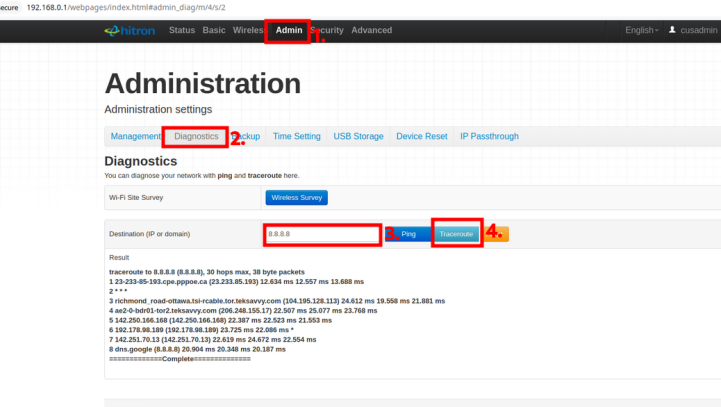
Traceroute
Login to the modem using a web Interface
1.Enter http://192.168.0.1 into the address bar in your web browser Chrome, Firefox or Safari.
2.You will be asked to enter username: cusadmin and password:<the Wi-Fi network password that you configured in the Quick Setup>
3. Select Admin choose Diagnostics, in the destination (IP or domain) section type:
- 1.1.1.1 or cloudflare.com
- click traceroute.
Modem Logs
Help desk will occasionally request screenshots of their modem logs. These logs provide a clearer insight of what is happening with your modem. Follow the steps below:
Login to the modem using a web Interface
Your modem must be connected to your device by a Ethernet connection or WiFi.
- Enter http://192.168.0.1 into the address bar in your web browser Chrome, Firefox or Safari.
- 2. A login screen for the Hitron CODA-4680 will appear. The default username and password are case-sensitive.
- Username: cusadmin
- Password: <the Wi-Fi network password that you configured in the Quick Setup>
- Under status select DOCSIS Event
DNS
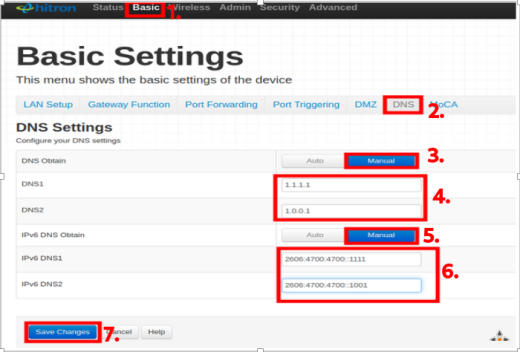
How to change your DNS settings
Login to the modem using a web Interface
Connect to your modem using a wired Ethernet cable or join your Wireless network
Enter http://192.168.0.1 into the address bar in your web browser Chrome, Firefox or Safari.
You will be asked to enter username: cusadmin and password:<the Wi-Fi network password that you configured in the Quick Setup>
1.Select Basic tab
2.Select DNS tab
DNS Settings
Configure your DNS settings:
3.Change the settings for DNS Obtain to Manual
4.Change the settings for DNS1 and DNS2 type in the IP address below. We recommend using the Cloudflare DNS servers at:
- DNS1: 1.1.1.1
- DNS2: 1.0.0.1
5. Change the settings for IPv6 Obtain to Manual
6.Change the settings for IPv6 DNS1 and IPv6 DNS2 type in the IP address below. We recommend using the Cloudflare DNS servers at:
- IPv6 DNS1: 2606:4700:4700::1111
- IPv6 DNS2: 2606:4700:4700::1001
7. Click Save Changes at the bottom
Once changes have been saved power cycle the modem.
Troubleshooting Wi-Fi
Most problems with Wi-Fi are a result of interference from other wireless or electronic devices, or signal strength problems (e.g., due to obstructions or distance).
Signal Strength problems
If you have a strong, solid signal in some parts of your home but not in others, then obstructions or distance could be playing a role.
Large appliances, such as refrigerators, can block Wi-Fi signals if the appliance is between your device and the modem. This can sometimes be resolved easily by moving you and/or your device from one part of the room to another. If your home is large and you are just running out of Wi-Fi range, then a Wi-Fi mesh home system or Wifi extenders may be required. These can be purchased from NCF, and are placed around your home to extend the Wi-Fi range to other areas.
Common Fixes For WiFi
Changing WiFi Channels on CODA-4680
Changing the wifi channels for 2.4 bandwidth
Connect to your modem using a wired Ethernet cable or join your Wireless network
Step 1
Login to the modem using a web Interface
- Enter http://192.168.0.1 into the address bar in your web browser Chrome, Firefox or Safari.
Step 2
You will be asked to enter username: cusadmin and password:<the Wi-Fi network password that you configured in the Quick Setup>
Step 3
Click on wireless choose basic settings should already be selected 2.4 tab will be selected by default.
Step 4
Change the channel bandwidth switch 20/40 MHz to 20MH
Step 5
Change the wireless channel from auto to any of the channels in the drop down menu
Step 6
After selecting a channel save changes
Band steering
When connecting a device to your home network, most WiFi modems prompt you to choose between two frequencies: 2.4 GHz or 5 GHz.Band steering automatically connects your devices to the most appropriate WiFi frequency in your home.
Steps to enable band steering
Step 1
Connect to your modem using a wired Ethernet cable or join your Wireless network
Login to the modem using a web Interface Enter http://192.168.0.1 into the address bar in your web browser Chrome, Firefox or Safari
Step 2
You will be asked to enter username: cusadmin and password:<the Wi-Fi network password that you configured in the Quick Setup>
Step 3
- Click on wireless
- Click on the Advanced tab
- Ensure that the Band streeting is Enable
- Click save changes
Disabling Bandsteering
When Band Steering is disabled, you can create two separate networks (or SSIDs), each with its own password and name. You can then connect specific devices to a specific network, either 2.4 or 5G.
Steps to disabling bandsteering
Step 1
Login to the modem using a web Interface
- Enter http://192.168.0.1 into the address bar in your web browser Chrome, Firefox
Step 2
You will be asked to enter username: cusadmin and password:<the Wi-Fi network password that you configured in the Quick Setup>
Step 3
- Click on wireless
- Click on the Advanced tab
- Ensure that the Band streeting is Disabled
- Click save changes


