
Changing Wi-Fi Channels on TP-Link EX921v modem

- Home
- Changing Wi-Fi Channels on TP-Link EX921v modem
- [Installation Guide]
Preparation
Updated: October 2025
1. Connect a computer directly to the TP-Link EX-921v by plugging one end of an Ethernet (RJ-45) cable into any port labeled LAN on the modem, and the other end into the Ethernet port on your computer. Alternatively, you can complete the process over Wi-Fi using a mobile phone, tablet, or laptop, if a wired connection is not available.
2. Open the browser of your choice and access the modem’s web interface by entering http://192.168.0.1 or http://tplinkwifi.net into the address bar, then press Enter or click on Go. You will be prompted to provide your device's password.
Note: If NCF has already configured your modem, use your Fibre password.
3. In the menu on the left-hand side, click Wireless, then select Wireless Settings.
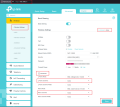
4. Click Advanced to view parameters for the 2.4 GHz and 5 GHz bands. By default, the channel is set to Auto. You can manually select a specific channel based on which performs best in your area to reduce interference.
5. To change the channel for the 6 GHz band, click 6 GHz at the top right of the page, then select the desired channel from the dropdown menu.
6. Once you have adjusted your Wi-Fi settings, click Save at the bottom of the page to apply the new configuration.
Images
Wi-Fi Channels
