
Hitron CODA-4680


Sold from April 2021
- Home
- Router Configuration
- Bridge Configuration
- Changing Wi-Fi Channels
- Port Forwarding
- Hitron CODA-4680 - Quick Start Guide
- Hitron CODA-4680 - User Guide
- Hitron CODA-4680 - Data Sheet
- Hitron CODA-4680 - Manufacturer Page
Network Eligibility
The Hitron CODA-4680 available from NCF has been certified by the following cable network vendors for operation on their infrastructure:
- Rogers (Ontario)
Firmware
Current certified firmware version: 7.2.4.5.2b8 (on the Rogers cable network)
Cable network operators control what cable modems and firmware versions can be used on their networks. Operators run all cable devices and firmware versions through their own testing process, after which the device and firmware are certified for use on the cable network. After the testing and approval process of a new version of firmware for a cable device, cable network operators may then automatically upgrade all cable modems connected on their network with the latest certified firmware.
NCF does not have access to firmware that it can provide to members.
EasyConnect Quick Setup
When you first connect the Hitron CODA-4680, you'll be prompted to complete the Hitron EasyConnect Quick Setup. EasyConnect tests the internet connection to ensure that it is working, and will prompt you to set a Wi-Fi network name and password that you would like to use. The password you set in EasyConnect also serves as the password you will use when logging into the modem to access its configuration. You must successfully complete the EasyConnect Setup before you can use your internet connection-- if EasyConnect finds that the connection to the internet is not working, you will be unable to set a Wi-Fi network name and password.
To start Hitron EasyConnect Quick Setup:
- Connect your Hitron CODA-4680 as described in the Quick Start Guide that came with your modem.
- Connect a device to the modem in one of two ways:
- Plug an ethernet cable from your device's network card to any one of the LAN ports on the back of the modem, or
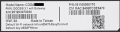
- Connect a device to the modem's EasyConnect Wi-Fi network. The EasyConnect Wi-Fi network only connects your device to the modem, it will not connect your device to the internet. The EasyConnect Wi-Fi network name and password is specific to your modem, and can be found on the label on the back of the modem. It takes the form of:
- Default Wi-Fi Network: CODAXXXXX-EasyConnect (XXXXX is a series of numbers)
- Default key: ZZZZZZZXXXXX (a series of numbers)
- Open up a web browser on the device you connected to the modem, and browse to any website.
- The Hitron EasyConnect Quick Setup screen should automatically load in your web browser. If it does not, enter 192.168.0.1 in your web browser's URL bar to load the Hitron EasyConnect Quick Setup manually.
- To begin the Quick Setup, select Let's Go:

- Select Test Connection to test the modem's internet connection:

- If the test is successful, the Quick Setup will confirm that your modem is connected to the internet. Select Setup Wi-Fi to configure the Wi-Fi network name and password you wish to use. If the test is not successful, you will not be able to provide with the Quick Setup. Check the light pattern on the Hitron COD-4680, or turn it off, reconnect the coaxial cable, and try the Quick Setup again.

- Enter the Wi-Fi Network Name and Password you wish to use to connect to the internet. Re-enter the password to Confirm Password, and select Confirm Setup:

- Verify that the displayed Wi-Fi Network Name and Password are what you entered, and select Complete My Setup. If you need to make any changes, select Edit. Note that the Quick Setup will use the same Wi-Fi Network Name on both the 2.4GHz and 5GHz bands by default, and you can change these later if you wish by accessing the modem configuration pages.

- Select Close to complete the Quick Setup. If you your device is connected to the Hitron CODA-4680 via the default CODAXXXXX-EasyConnect Wi-Fi Network, disconnect your device from that network and reconnect to the Wi-Fi network you just named, using the password that you set.

- You can now access the internet using the Hitron CODA-4680.
Accessing the Configuration
You must complete the EasyConnect Quick Setup for the Hitron CODA-4680 before you can access its configuration. If you have not completed the Quick Setup, you will be directed to it when attempting the follow the steps below.
To access the Hitron CODA-4680 configuration:
- Ensure you have successfully completed the EasyConnect Quick Setup for the modem.
- Connect a device to the modem by plugging an ethernet cable from your device into one of the LAN ports on the back of the modem, or by connecting your device to the modem over Wi-Fi.
- Open up a web browser on your connected device.
- Enter 192.168.0.1 in your web browser's URL bar.
- A login screen for the Hitron CODA-4680 will appear. The default username and password are case-sensitive, and are:
- Username: cusadmin
- Password: <the Wi-Fi network password that you configured in the Quick Setup>
- Select Login. The Status Overview screen will display.
Modes of Operation
- Routed - Functions as both a modem and Wi-Fi router, which is recommended for most members. Another router can be added to extend the network, but each network must use a different subnet.
- Bridge - (Advanced) Functions only as a modem. A separate router is required to provide Wi-Fi.
Factory Reset
When you reset the CODA-4680 to its factory default settings, all user-configured settings are lost, and the modem is returned to its initial configuration state.
To factory reset the CODA-4680:
- Using a pin or pencil tip, press and hold the recessed RESET button at the back of the modem for at least 10 seconds, or
- Login to the CODA-4680 Configuration. Under Admin, choose Device Reset tab, and select the Factory Reset button.
The CODA-4680 will turn off and on again, and load with its factory default settings. After performing a Factory Rese, the EasyConnect Quick Setup will have to be re-completed before the internet connection can be used.
Modem Logs

To access the modem logs of the CODA-4680:
- Open a web browser and enter 192.168.0.1 into the address bar, then press enter.
- A login screen for the Hitron CODA-4680 will appear. The default username and password are case-sensitive, and are:
- Username: cusadmin
- Password: <the Wi-Fi network password that you configured in the Quick Setup>
- Select Login. The Status Overview screen will display.
- On the Status page, click Docsis Event
- The Docsis Event page will display the logs in a table under Docsis Logs. You can copy and paste the contents of the tables into a text file or email, which can then be sent to NCF for further troubleshooting.
Modem Lights
The operational status of the Hitron CODA-4680 is indicated by lights (LEDs). These LEDs indicate the status of the modem's power, downstream connection (DS), upstream connection (US), internet connectivity (@), Wi-Fi availability (2.4GHz and 5GHz), active Ethernet ports (Ethernet), active USB port (USB) and MoCA indicator.
Information is communicated by the light colour (green or blue) and state (solid, off, or flashing).
Here's a summary of how to read the lights on the Hitron CODA-4680:

Modem Diagnostics
The Hitron Coda-4680 has three troubleshooting tools into it, Ping, Traceroute, and Wireless Survey. To access these tools:
- Open a web browser and enter 192.168.0.1 in the address bar, then press Enter/Go.
- A login screen for the Hitron-CODA-4680 will appear. The default username and password are case-sensitive, and are:
- Username: cusadmin
- Password: <the Wi-Fi network password that you configured in the Quick Setup>
- Select Login. The Status Overview screen will display.
- Click Admin at the top of the page.
- You're now on the Administration page. Click Diagnostics.
Ping
A Ping test can be used to test the reach-ability of hosts. It measures the round-trip time for messages sent from the originating host to a destination computer that are echoed back to the source.
To use the Ping tool, enter a domain name (like www.google.com) or an IP address in the Destination text box, then press Ping. The ping test will send four packets to the target destination, providing info on how long each of those packets took to reach their destination. If your connection is working well, you should see 4 replies, though some destinations will not respond to ping.
Traceroute
To use the Traceroute tool, enter a website address or IP address in the Destination text box, then press Traceroute. It should take less than a minute to complete and when complete, it'll generate a report which can be copy-pasted into a text file or email. Each row of the report will have the following: the hop number, the address of the hop, and three entries for the Round Trip Time (RTT).
Wireless Survey
The Wireless Survey performs a scan of all the available Wi-Fi networks and will generate a report, listing the available networks, along with the Wi-Fi channel they're operating on, and their signal strength. This information can be used to determine which Wi-Fi channel has the least amount of wireless interference.
To use the Wireless Survey, press the Wireless Survey button. It takes approximately one minute for the survey to be completed, and a report will be generated once done.
Images
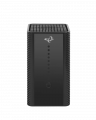
Hitron CODA-4680: Front
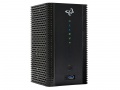
Hitron CODA-4680: Angled
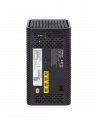
Hitron CODA-4680: Back
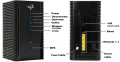
Hitron CODA-4680: Diagram
Hitron CODA-4680: Back label


