Screenshots
What is a Screenshot?
A screenshot also named screen capture (screencap) or screengrab, is a digital image of the data displayed on the screen of a computer or mobile device. A screenshot simply captures the contents of a computer or mobile device display at a specific moment. It allows for computer or mobile device users to save and share what is seen on the screen, whether it be a web page, an error message, a funny conversation, or anything else. Screenshots represent the content of a screen in pixels from a brief moment in time. Keep in account that to take a screenshot on a computer or mobile device depends on the operating system.
How to take a Screenshot: Windows PC
Full screen Screenshot on Windows
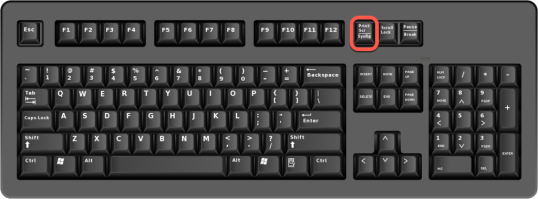
On Windows, press the "Print Screen" key on the keyboard to capture the entire screen or use "Alt" and "Print Screen" to capture only the active window.
- Click ‘Start’.
- Open ‘Paint’. Do a search for ‘Paint’ if you can’t find it.
- Click ‘File’.
- Click ‘New’ to open a new page.
- Click on ‘Paste’ in the new page.
- Click on ‘File’.
- Click on ‘Save As’.
- Name the new file, choose where you want it to save on your computer, and click ‘Save’.
Part of the screen Screenshot on Windows
- Click ‘Start’.
- Click ‘Snipping Tool’. Do a search for ‘Snipping Tool’ if you can’t find it.
- In the ‘Snipping Tool’ select ‘New’.
- The cursor will then change to a crosshair pointer.
- Move the crosshair to where you want to capture.
- Click and drag to select an area.
- When you have selected the area you need, release your Mouse or Trackpad.
- Click on ‘File’.
- Click on ‘Save As’.
- Name the new file, choose where you want it to save on your computer, and click ‘Save’.
Users running Windows 10
Use the ‘Print Screen’ button (PrtSc). You'll find it on the upper-right side of most keyboards (or next to the Space Bar on some). It will copy an image of your entire screen to the clipboard. You can then hit ‘Ctrl + V’ to paste it into a document.
How to take a Screenshot: Apple Mac
Full screen Screenshot on a Mac
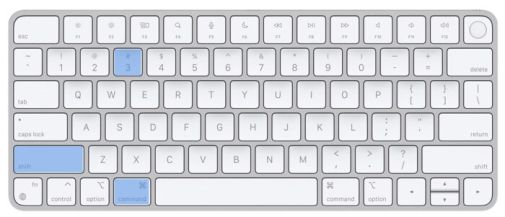
- Pressing the "Command", "Shift" and "3" keys (all at the same time) will capture the entire screen.
- You should see the screen flash or change before it goes back to normal.
- The screenshot usually gets saved to the Mac desktop.
Part of the screen Screenshot on a Mac
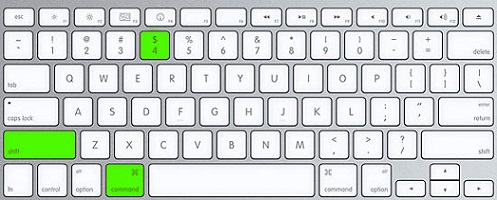
- Pressing the "Command", "Shift" and "4"keys (all at the same time), will bring up the screen-capture window which allows you to capture different parts of the screen or a particular window.
- The cursor will then change to a crosshair pointer.
- Move the crosshair to where you want to capture.
- Click and drag to select an area.
- To adjust an area, hold ‘Shift’, ‘Option’, or the ‘Space bar’ while you drag.
- When you have selected the area you need, release your Mouse or Trackpad.
- You should see the screen flash or change before it goes back to normal.
- The screenshot usually gets saved to the Mac desktop.
How to take a Screenshot: Google Chromebook
Full screen Screenshot on a Google Chromebook
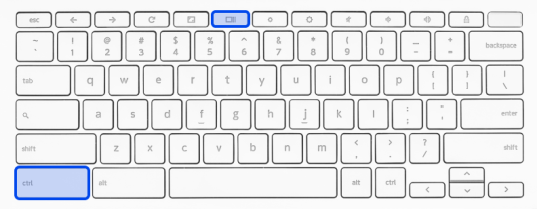
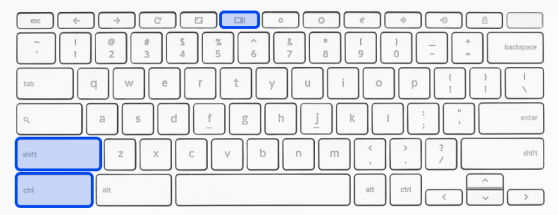
- Press the "Ctrl" and "Show Windows" keys on your keyboard at the same time.
- A notification will pop up in the bottom right corner of your screen. The screenshot will be saved to the files app on your Chromebook, and is labeled as a screenshot with the time and date of when the screenshot was created.
Part of the screen Screenshot on a Google Chromebook
- Press the "Ctrl", "Shift" and "Show Windows" keys on your keyboard at the same time.
- Your cursor turns into a little target. You are now able to left click and drag with your mouse to select the area you want to screenshot. Releasing the mouse button will present you with a request to capture what was selected.
- A notification will pop up in the bottom right corner of your screen. The screenshot is saved to the files app on your Chromebook, and is labeled as a screenshot with the time and date of when the screenshot was created.
How to take a Screenshot: Android
The screenshot is usually saved in the same place as all other photos you take. Many different devices use Google’s Android operating system, so there are different ways screenshots can be taken. You should be able to take screenshots on most Android devices by holding down the ‘Power’ and ‘Volume down’ buttons. Some devices also have a screenshot button in the pull-down menu.
How to screenshot on Samsung
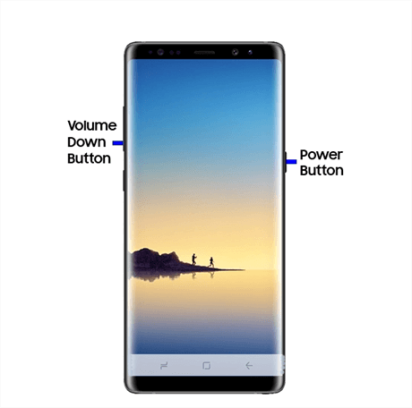
- Press and hold the "Power" button and the "Volume down" button (at the same time) for 1 to 2 seconds to take the screenshot.
- You should see the screen flash or change before it goes back to normal.
- The screenshot is usually saved in the same place as all other photos you take.
Samsung phones also support hand gestures to take screenshots. To do this you can:
- Position your hand like you plan to karate chop the phone, then swipe the entire side of your hand along the screen from left to right.
- You may need to set this up by going to "Settings", "Advanced features", "Motion and gestures" and "Palm swipe" to capture.
- The screenshot is usually saved in the same place as all other photos you take.
If your phone has "Bixby", you can use voice command to ask the voice assistant to take a screenshot for you.
How to screenshot on Google Pixel
- Open the screen that you want to capture.
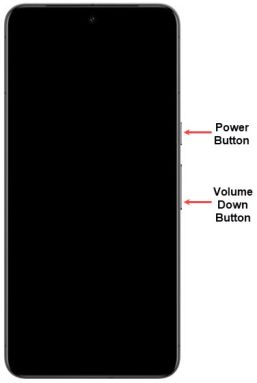
- Press the "Power" and "Volume down" buttons at the same time.
- Your phone will take a picture of the screen and save it.
- At the bottom left, you will find a preview of your screenshot.
If your phone has "Google Assistant", you can use voice command to ask the voice assistant to take a screenshot for you.
How to take a Screenshot: iPad or iPhone
The screenshot is usually saved in the same place as all other photos you take.
Taking a screenshot with an iPad or iPhone
On devices with a Home button:
- Hold down the ‘Power’ button and press the ‘Home’ button (at the exact same time).
- If your sound is on, you will hear a camera shutter and see a ‘flash’ on the screen when you take a screenshot.
- Tap on the screenshot preview that appears in the bottom left corner of your screen, then tap ‘Done’.
- Select where you would like to save your screenshot:
- ‘Save to Photos’ – the screenshot will appear in your camera roll and in the Screenshots album of your Photos app.
- ‘Save to Files’ – the screenshot can be saved to your iCloud account.
On devices without a Home button:
- Hold down the ‘Power’ button on the right of the device (top button on an iPad) and the ‘Volume up’ button at the same time.
- Follow steps 2, 3 and 4 for devices that have a Home button.
If you have an Apple Watch:
- You must first enable the screenshot function. Open the Watch app on your iPhone, and choose ‘My Watch’, ‘General’, ‘Enable Screenshots’ and toggle it ‘On’.
- To take a screenshot on an Apple Watch hold the ‘Side’ button and click the ‘Digital Crown’ simultaneously. The screenshot will then appear on your iPhone, not the watch itself.
Remember to check your settings and make sure that your Screenshots folder is being backed up to your iCloud account. This can give you extra reassurance that the screenshot is saved.
Screen Recording
What is Screen Recording?
A screen recording, also known as screencast or video screen capture, is a digital recording of a computer screen output, often containing audio narration. Screen recording compares with the related term screenshot; whereas screenshot generates a single picture of a computer screen, a screen recording primarily records what is on the screen of a computer or mobile device, including audio and video, and saves to the computer.
How to take a Screen Recording: Windows PC
Xbox Game Bar is built into Windows 11 and Windows 10 and lets you make a screen recording one application at a time.
- Press together the ‘Windows Key’ + ‘Alt’ + ‘R’ at the same time.
- A recording widget will appear in the corner of your screen to start recording.
- Turn on or off your microphone for your audio preferences.
- Stop recording your screen by holding together ‘Windows Key’ + ‘Alt’ + ‘R’ at the same time or press the ‘Stop’ button in the recording widget.
- You will usually find the recording in your Videos/Captures folder from File Explorer.
Note: Xbox Game Bar won’t be able to record your Windows desktop or File Explorer. You may need to download a third-party application to your desktop to do this.
How to take a Screen Recording: Mac
- Pressing the ‘Command’, ‘Shift’ and ‘5’ keys (all at the same time), will bring up the screen-capture window. Next to screen capture options, there are options for screen recordings – ‘Record the entire screen’ or ‘Record a portion of the screen’. These options appear with an icon in the bottom right corner that looks like a big dot with a thin circle on the outside.
- Select the screen recording option you need and click ‘Record’.
- Stop recording by clicking on the ‘Stop recording’ button in the menu.
- The recording usually gets saved to the Mac desktop.
How to take a Screen Recording: Samsung or Other Android Devices
- Access your ‘Quick settings’ from the pull-down menu.
- Add the ‘Screen recorder’ function by clicking on the pencil icon in the bottom left corner, then tap and drag the ‘Screen recorder’ icon into your ‘Quick settings’.
- Tap the ‘Screen recorder’ icon and then tap the ‘Start’ button to start recording your screen.
- Stop recording your screen by swiping down from the top of your screen to find the Screen recorder notification bar and select ‘Tap to stop’.
- The recording is stored in your default camera roll – usually Google Photos.
How to take a Screen Recording: iPad or iPhone
- Check your Control Centre settings in your Settings app to make sure the ‘Screen recording’ function is selected as an option.
- Open your Control Centre from the pull-down menu and tap on the grey ‘Record’ icon. This icon looks like a big dot with a thin circle on the outside. Once tapped, a three-second countdown will start.
- Swipe up to exit from the Control Centre and start recording your screen.
- Stop recording your screen by opening the Control Centre from the pull-down menu and tapping on the ‘Record’ icon, which will now be red. You can also tap the red bar with the recording time at the top of your screen to stop recording.
- The recording will be saved in the camera roll in your Photos app.
Note: There may be some apps that won’t allow you to record your screen while using them. You also won’t be able to record your screen if you are using screen mirroring at the same time.

