
Difference between revisions of "TP-Link EX921v"
(Created page with "=Preparation= '''Updated: October 2025'''") |
|||
| (2 intermediate revisions by the same user not shown) | |||
| Line 1: | Line 1: | ||
<div class="ncfrightbox w-25"> {{Template:TP-Link EX921v}} </div> | |||
=Preparation= | =Preparation= | ||
''' | Updated: October 2025 | ||
The '''TP-Link EX-921v''' is a VoIP router that integrates '''Wi-Fi 6E''' technology and supports fibre broadband connections through an '''SFP''' (Small Form-factor Pluggable) module. | |||
=Configuration= | |||
'''If you pick up the device from the NCF office, it should already be configured for your account.''' You can follow our instructions to configure the modem yourself, or contact [mailto:support@ncf.ca support@ncf.ca] if you would like to bring your modem to our office to be configured. | |||
=Quick Setup= | |||
'''1.''' Plug the power adapter into a wall outlet and then into the back of your EX-921v. A power bar with a surge protector is recommended. Power-up the modem by pressing the ON/OFF button on the back. | |||
'''2.''' Connect a computer directly to the modem by plugging one end of an Ethernet (RJ-45) cable into any port labeled LAN on the modem, and then connect the other end of the cable to the Ethernet port on your computer. | |||
'''Note:''' We do not recommend configuring your modem over a Wi-Fi connection. However, if this is your only option, locate the '''default Wi-Fi''' information on the back of your modem and connect your device (such as a mobile phone, tablet, or laptop) to the default SSID, then enter the corresponding Wi-Fi '''password''' or '''PIN''' to proceed with the configuration. | |||
'''3.''' Open the browser of your choice and access the modem’s web interface by entering '''http://192.168.0.1''' or '''http://tplinkwifi.net''' into the address bar, then press '''Enter''' or click on '''Go.''' You will be prompted to '''create a new password and confirm it''' for security purposes. After saving the new password, the login screen will appear; enter the password you just created and click Login to access the router’s configuration page, where you can proceed with the setup process. | |||
Note: If NCF has already configured your modem, use your Fibre password. | |||
'''4.''' At the top, click on the Quick Setup tab, and set the next parameters. | |||
==Parameters == | |||
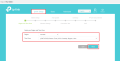
'''-Region and Time Zone:''' | |||
a. Set Region to '''Canada''' | |||
b. Time Zone to '''(GMT-05:00) Eastern Time (US & Canada); Bogota, Lima''' | |||
c. Click '''Next''' | |||
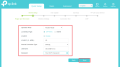
'''-Internet Setup:''' | |||
a. Operation mode: '''Router mode''' | |||
b. L2 Interface type: '''SFP WAN''' | |||
c. VLAN ID: '''Enable''' | |||
d. VLAN ID: '''40''' | |||
e. Internet connection type: '''PPPoE''' | |||
f. Username: '''ab123@ncf.ca''' (where ab123 is your NCF ID) | |||
g. Password: Password: '''••••••••''' (where •••••••• is your NCF Fibre Password) | |||
h. Click '''Next''' | |||
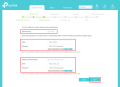
'''-Wireless Settings''' | |||
a. Band Steering: '''Enable''' | |||
b. SSID: (WiFi Name) to format '''NCF_0000''' | |||
c. Password: your Fibre password | |||
d. Wireless Network (6GHz): '''Enable wireless radio''' | |||
e. SSID: (WiFi Name) to format '''NCF_0000_6G''' | |||
f. Password: your Fibre password | |||
g. Click '''Next''' | |||
For the remaining parameters, simply click '''Next''' on each screen until you reach the end of the Quick Setup Wizard, where you will see the option to click '''Finish''' to complete the configuration process. | |||
'''Note''': If you are configuring your EX-921v via Wi-Fi, the new SSID you created will appear in the list of available networks. Connect your device to this network using the Wi-Fi password you set during configuration. Once you have confirmed that you have internet access, you may close the browser to complete the setup. | |||
=Images= | |||
{{Template:Back_to_the_Top}} | |||
<gallery mode="slideshow"> | |||
File:EX921v 1Time Zone.png|frameless|634x634px|Quick Setup Step 1 | |||
File:EX921v 2Internet Setup.png|frameless|634x634px|Quick Setup Step 2 | |||
File:EX921v 3Wireless.png|frameless|634x634px|Quick Setup Step 3 | |||
File:EX921v 4Wireless.png|frameless|634x634px|Quick Setup Step 4 | |||
File:EX921v 5Update.png|frameless|634x634px|Quick Setup Step 5 | |||
File:EX921v 6Summary.png|frameless|634x634px|Quick Setup Step 6 | |||
</gallery> | |||
==See Also== | |||
{{Template:Back_to_the_Top}} | |||
Latest revision as of 15:10, 22 October 2025

- Home
- Changing Wi-Fi Channels on TP-Link EX921v modem
- [Installation Guide]
Preparation
Updated: October 2025
The TP-Link EX-921v is a VoIP router that integrates Wi-Fi 6E technology and supports fibre broadband connections through an SFP (Small Form-factor Pluggable) module.
Configuration
If you pick up the device from the NCF office, it should already be configured for your account. You can follow our instructions to configure the modem yourself, or contact support@ncf.ca if you would like to bring your modem to our office to be configured.
Quick Setup
1. Plug the power adapter into a wall outlet and then into the back of your EX-921v. A power bar with a surge protector is recommended. Power-up the modem by pressing the ON/OFF button on the back.
2. Connect a computer directly to the modem by plugging one end of an Ethernet (RJ-45) cable into any port labeled LAN on the modem, and then connect the other end of the cable to the Ethernet port on your computer.
Note: We do not recommend configuring your modem over a Wi-Fi connection. However, if this is your only option, locate the default Wi-Fi information on the back of your modem and connect your device (such as a mobile phone, tablet, or laptop) to the default SSID, then enter the corresponding Wi-Fi password or PIN to proceed with the configuration.
3. Open the browser of your choice and access the modem’s web interface by entering http://192.168.0.1 or http://tplinkwifi.net into the address bar, then press Enter or click on Go. You will be prompted to create a new password and confirm it for security purposes. After saving the new password, the login screen will appear; enter the password you just created and click Login to access the router’s configuration page, where you can proceed with the setup process.
Note: If NCF has already configured your modem, use your Fibre password.
4. At the top, click on the Quick Setup tab, and set the next parameters.
Parameters
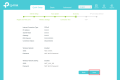
-Region and Time Zone:
a. Set Region to Canada
b. Time Zone to (GMT-05:00) Eastern Time (US & Canada); Bogota, Lima
c. Click Next
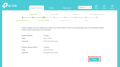
-Internet Setup:
a. Operation mode: Router mode
b. L2 Interface type: SFP WAN
c. VLAN ID: Enable
d. VLAN ID: 40
e. Internet connection type: PPPoE
f. Username: ab123@ncf.ca (where ab123 is your NCF ID)
g. Password: Password: •••••••• (where •••••••• is your NCF Fibre Password)
h. Click Next
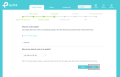
-Wireless Settings
a. Band Steering: Enable
b. SSID: (WiFi Name) to format NCF_0000
c. Password: your Fibre password
d. Wireless Network (6GHz): Enable wireless radio
e. SSID: (WiFi Name) to format NCF_0000_6G
f. Password: your Fibre password
g. Click Next
For the remaining parameters, simply click Next on each screen until you reach the end of the Quick Setup Wizard, where you will see the option to click Finish to complete the configuration process.
Note: If you are configuring your EX-921v via Wi-Fi, the new SSID you created will appear in the list of available networks. Connect your device to this network using the Wi-Fi password you set during configuration. Once you have confirmed that you have internet access, you may close the browser to complete the setup.
Images
Quick Setup Step 1
Quick Setup Step 2
Quick Setup Step 3
Quick Setup Step 4
Quick Setup Step 5
Quick Setup Step 6


