Difference between revisions of "IPhone"
(Created page with 'These instructions will lead you through setting up Apple Mail for POP/SSL. == How to Setup Mail == * Open the '''Settings''' app * Select '''Mail, Contacts, Calendars''' * Sel…') |
|||
| (13 intermediate revisions by 3 users not shown) | |||
| Line 8: | Line 8: | ||
* Select '''Other''' | * Select '''Other''' | ||
* Select '''Add Mail Account''' | * Select '''Add Mail Account''' | ||
* Fill in your name, email address, and password | * Fill in your name, email address, and [[password]] | ||
* Fill in the same '''Hostname/Username/Password''' for '''both incoming and outgoing''' | * Fill in the same '''Hostname/Username/Password''' for '''''<u>both</u>'' incoming and outgoing''' (even though the text says '''Optional''', you must enter the info, or an error message will tell you that the server doesn't allow relaying!) | ||
* And you're done! | * And you're done! | ||
* If you have network access, the phone will verify the account and it will be ready for use immediately. | * If you have network access, the phone will verify the account and it will be ready for use immediately. | ||
==Set-up screenshots== | |||
[[File:Iphone_mail_1.png]] | [[File:Iphone_mail_1.png]] | ||
<br>________________________________________________________________________________________________________________<br> | |||
[[File:Iphone_mail_2.png]] | [[File:Iphone_mail_2.png]] | ||
<br>________________________________________________________________________________________________________________<br> | |||
[[File:Iphone_mail_3.png]] | [[File:Iphone_mail_3.png]] | ||
<br>________________________________________________________________________________________________________________<br> | |||
[[File:Iphone_mail_4.png]] | [[File:Iphone_mail_4.png]] | ||
<br>________________________________________________________________________________________________________________<br> | |||
[[File:Iphone_mail_5.png]] | [[File:Iphone_mail_5.png]] | ||
=== Confirm Mail Settings === | |||
If you're having trouble, it may be that the initial setup process did not autodetect the correct settings for the mail server. Follow these steps to confirm your mail account is setup correctly. | |||
'''Note: These instructions and screenshots are for iOS8.''' | |||
* Open the '''Settings''' app | |||
* Select '''Mail, Contacts, Calendars''' | |||
* Select the NCF mail account | |||
* Select '''Account ab123@ncf.ca''' | |||
* Confirm that '''Incoming Mail Server''' has the following settings: | |||
Host Name: '''mail.ncf.ca''' | |||
Username: '''ab123''' (eg. your NCF accountID) | |||
Password: (your NCF account password) | |||
* Select '''Advanced''' | |||
* Confirm that '''Incoming Settings''' has the following settings: | |||
Use SSL: '''Yes''' | |||
Authentication: '''Password''' | |||
IMAP Path Prefix: '''/''' | |||
Server Port: '''993''' | |||
* Select '''< Account''' at the top-left to return to the main account settings | |||
* Select '''SMTP mail.ncf.ca>''' | |||
* Select '''mail.ncf.ca''' if there is more than one mail server (this step may not appear for you) | |||
* Confirm the following settings: | |||
Host Name: '''mail.ncf.ca''' | |||
Username: '''ab123''' (eg. your NCF AccountID) | |||
Password: (your NCF account password) | |||
Use SSL: '''Yes''' | |||
Authentication: '''Password''' | |||
Server Port: '''587''' | |||
* Select '''Done''' at the top-right. | |||
[[File:Iphone_mail_confirm_1.png]] | |||
<br>________________________________________________________________________________________________________________<br> | |||
[[File:Iphone_mail_confirm_2.png]] | |||
<br>________________________________________________________________________________________________________________<br> | |||
[[File:Iphone_mail_confirm_3.png]] | |||
<br>________________________________________________________________________________________________________________<br> | |||
[[File:Iphone_mail_confirm_4.png]] | |||
<br>________________________________________________________________________________________________________________<br> | |||
[[File:Iphone_mail_confirm_5.png]] | |||
<br>________________________________________________________________________________________________________________<br> | |||
[[File:Iphone_mail_confirm_6.png]] | |||
== How to Setup Addresses (CardDAV) == | == How to Setup Addresses (CardDAV) == | ||
* Open the '''Settings''' app | |||
* Select '''Mail, Contacts, Calendars''' | |||
* Select '''Add account...''' | |||
* Select '''Other''' | |||
* Select '''Add CardDAV Account''' | |||
* Fill in the fields: | |||
Hostname: '''mail.ncf.ca''' | |||
Username: '''ab123''' (eg. fill in your own accountID) | |||
Password: (fill in your NCF account password) | |||
Description: '''NCF Addressbook''' | |||
* And you're done! | |||
All your Zimbra addressbooks will be available on the iPhone. | |||
[[File:Iphone_carddav_1.png]] | |||
== How to Setup Calendaring (CalDAV) == | == How to Setup Calendaring (CalDAV) == | ||
* Open the '''Settings''' app | |||
* Select '''Mail, Contacts, Calendars''' | |||
* Select '''Add account...''' | |||
* Select '''Other''' | |||
* Select '''Add CalDAV Account''' | |||
* Fill in the fields: | |||
Hostname: '''mail.ncf.ca''' | |||
Username: '''ab123''' (eg. fill in your own accountID) | |||
Password: (fill in your NCF account password) | |||
Description: '''NCF Calendars''' | |||
* And you're done! | |||
All your Zimbra calendars will be available on the iPhone. | |||
[[File:Iphone_caldav_1.png]] | |||
<br>________________________________________________________________________________________________________________<br> | |||
[[File:Iphone_caldav_2.png]] | |||
[[Category: Email]] | [[Category: Email]] | ||
[[Category: Apple]] | |||
Latest revision as of 12:43, 14 August 2019
These instructions will lead you through setting up Apple Mail for POP/SSL.
How to Setup Mail
- Open the Settings app
- Select Mail, Contacts, Calendars
- Select Add account...
- Select Other
- Select Add Mail Account
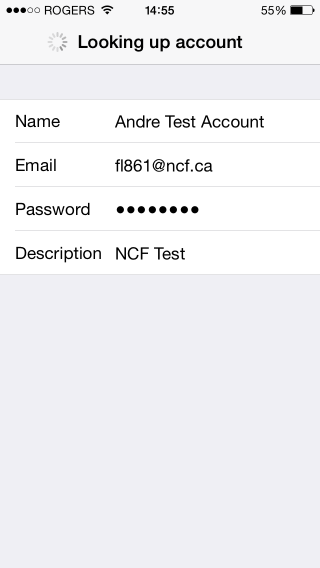
- Fill in your name, email address, and password
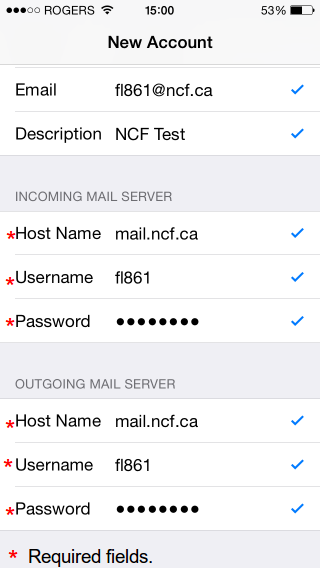
- Fill in the same Hostname/Username/Password for both incoming and outgoing (even though the text says Optional, you must enter the info, or an error message will tell you that the server doesn't allow relaying!)
- And you're done!
- If you have network access, the phone will verify the account and it will be ready for use immediately.
Set-up screenshots
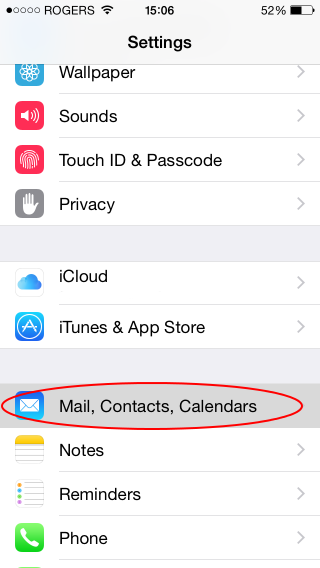
________________________________________________________________________________________________________________
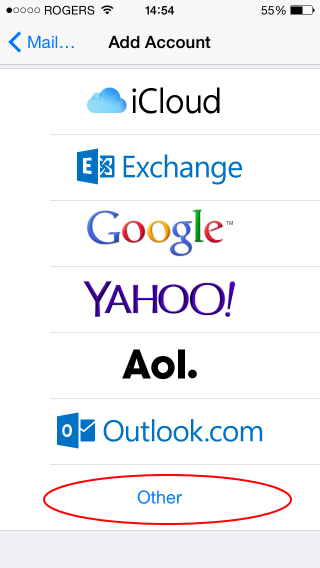
________________________________________________________________________________________________________________
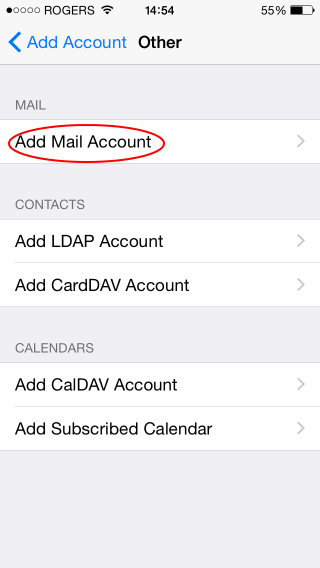
________________________________________________________________________________________________________________
________________________________________________________________________________________________________________
Confirm Mail Settings
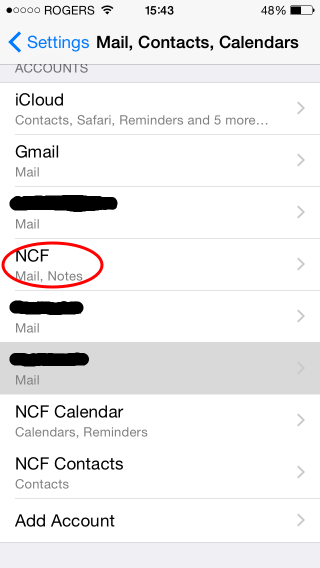
If you're having trouble, it may be that the initial setup process did not autodetect the correct settings for the mail server. Follow these steps to confirm your mail account is setup correctly.
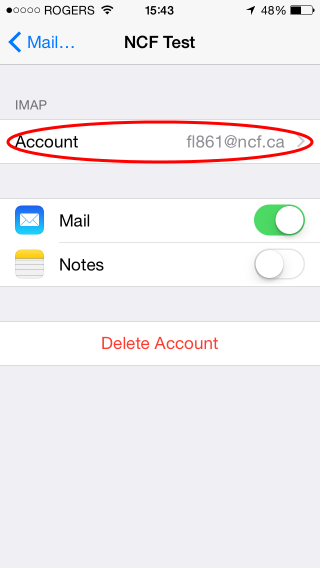
Note: These instructions and screenshots are for iOS8.
- Open the Settings app
- Select Mail, Contacts, Calendars
- Select the NCF mail account
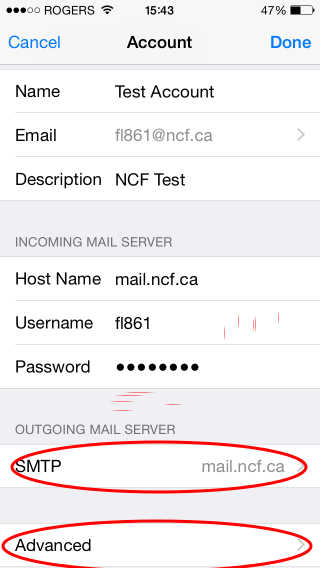
- Select Account ab123@ncf.ca
- Confirm that Incoming Mail Server has the following settings:
 Host Name: mail.ncf.ca
 Username:  ab123 (eg. your NCF accountID)
 Password:  (your NCF account password)
- Select Advanced
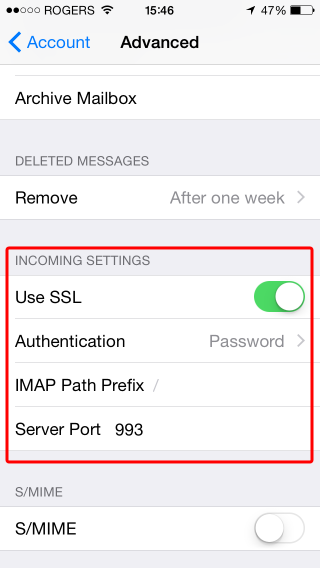
- Confirm that Incoming Settings has the following settings:
 Use SSL:          Yes
 Authentication:   Password
 IMAP Path Prefix: /
 Server Port:      993
- Select < Account at the top-left to return to the main account settings
- Select SMTP mail.ncf.ca>
- Select mail.ncf.ca if there is more than one mail server (this step may not appear for you)
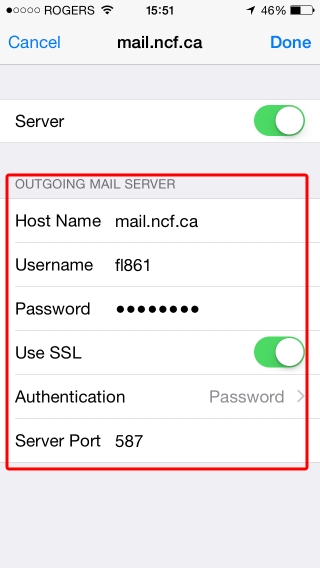
- Confirm the following settings:
 Host Name:      mail.ncf.ca
 Username:       ab123 (eg. your NCF AccountID)
 Password:       (your NCF account password)
 Use SSL:        Yes
 Authentication: Password
 Server Port:    587
- Select Done at the top-right.
________________________________________________________________________________________________________________
________________________________________________________________________________________________________________
________________________________________________________________________________________________________________
________________________________________________________________________________________________________________

________________________________________________________________________________________________________________
How to Setup Addresses (CardDAV)
- Open the Settings app
- Select Mail, Contacts, Calendars
- Select Add account...
- Select Other
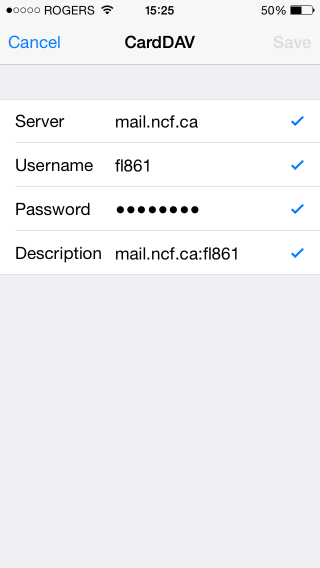
- Select Add CardDAV Account
- Fill in the fields:
 Hostname: mail.ncf.ca
 Username: ab123 (eg. fill in your own accountID)
 Password: (fill in your NCF account password)
 Description: NCF Addressbook
- And you're done!
All your Zimbra addressbooks will be available on the iPhone.
How to Setup Calendaring (CalDAV)
- Open the Settings app
- Select Mail, Contacts, Calendars
- Select Add account...
- Select Other
- Select Add CalDAV Account
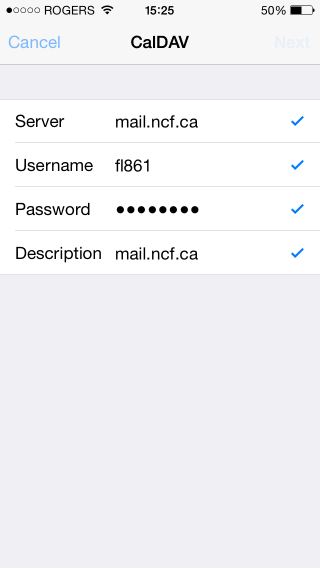
- Fill in the fields:
 Hostname: mail.ncf.ca
 Username: ab123 (eg. fill in your own accountID)
 Password: (fill in your NCF account password)
 Description: NCF Calendars
- And you're done!
All your Zimbra calendars will be available on the iPhone.
________________________________________________________________________________________________________________


