Difference between revisions of "Port forwarding"
(→Port forwarding on SmartRG Modems: formatting) |
|||
| Line 7: | Line 7: | ||
==Port forwarding on SmartRG Modems== | ==Port forwarding on SmartRG Modems== | ||
Setting up port forwarding SmartRG SR505N | Setting up port forwarding on a SmartRG SR505N | ||
1. Sign into your modem by logging in to the IP 192.168.1.1 and go to → Manage Gateway (Advanced) and enter your modem's login (usually admin for username and your DSL password for the password). | |||
===Assigned Static IPs to Devices on your Local Area Network=== | ===Assigned Static IPs to Devices on your Local Area Network=== | ||
To open up ports for a particular service you're using, we first have to specify which devices on your local network should be accessible over those ports. | To open up ports for a particular service you're using, we first have to specify which devices on your local network should be accessible over those ports. | ||
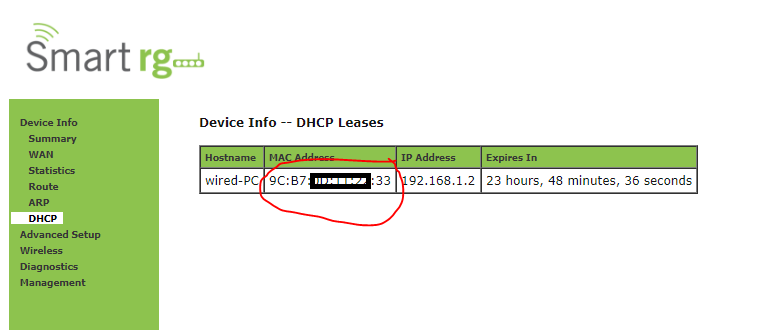
2. Click on the '''Device Info''' Menu Link and go to → the submenu '''DHCP''' | 2. Click on the '''Device Info''' Menu Link and go to → the submenu '''DHCP''' | ||
Copy the '''MAC Address''' for the device(s) you want to open up ports for and paste it in a text editor.<br> | Copy the '''MAC Address''' for the device(s) you want to open up ports for and paste it in a text editor.<br> | ||
[[File:1SR505-DHCP_List.PNG|DHCP List under Device Info]] | |||
3. Click on '''Advanced Setup''' → then '''LAN''' Submenu → | [[File:1SR505-DHCP_List.PNG|800px|DHCP List under Device Info]] | ||
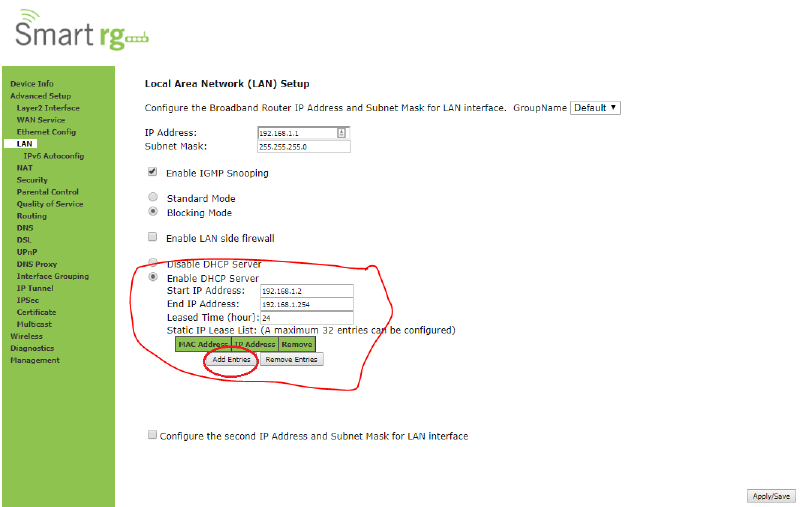
Locate the DHCP Server Range from as indicated in the diagram below (usually 192.168.1.2 to 254) and click on '''Add Entries''' under the '''Static IP Lease List''' table | |||
[[File:2DHCP_Server_Space.PNG| DHCP Server Space under LAN]] | 3. Click on '''Advanced Setup''' → then '''LAN''' Submenu → | ||
4. On the '''DHCP Static IP Lease''' page, Paste the MAC address for the devices you choose is Step 2 and assign a Static IP from the range note in Step 3 | |||
[[File:3DHCP_Reservation.PNG| DHCP Reservation to give a Static LAN IP to a specific MAC address]] | Locate the DHCP Server Range from as indicated in the diagram below (usually 192.168.1.2 to 254) and click on '''Add Entries''' under the '''Static IP Lease List''' table | ||
[[File:2DHCP_Server_Space.PNG|800px|DHCP Server Space under LAN]] | |||
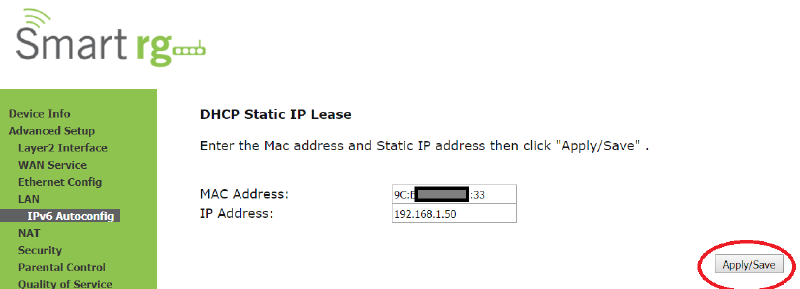
4. On the '''DHCP Static IP Lease''' page, Paste the MAC address for the devices you choose is Step 2 and assign a Static IP from the range note in Step 3 | |||
[[File:3DHCP_Reservation.PNG|800px|DHCP Reservation to give a Static LAN IP to a specific MAC address]] | |||
=== Creating Port Forwarding Rule=== | === Creating Port Forwarding Rule=== | ||
5. Click on '''NAT''' under the '''Advanced Setup''' menu and select '''Add''' under the '''Virtual Servers Setup''' page <br> | 5. Click on '''NAT''' under the '''Advanced Setup''' menu and select '''Add''' under the '''Virtual Servers Setup''' page <br> | ||
[[File:4NAT_-_Virtual_Servers_Setup.PNG| Adding a Virtual Server Rule]] | [[File:4NAT_-_Virtual_Servers_Setup.PNG|800px|Adding a Virtual Server Rule]] | ||
6. Select '''Custom Service'''. Set a descriptive service name (one that reminds you of what service is using the ports and what device on your local network it's being open for. | |||
Enter the Static IP address assigned in Step 4. | 6. Select '''Custom Service'''. Set a descriptive service name (one that reminds you of what service is using the ports and what device on your local network it's being open for). | ||
Enter the Port Needs in the '''External Port Start and End''' fields on the table and specify the Protocol type. | |||
A single port must be repeated in the '''Start''' and '''End''' columns as shown below. | Enter the Static IP address assigned in Step 4. | ||
Enter the Port Needs in the '''External Port Start and End''' fields on the table and specify the Protocol type. | |||
A single port must be repeated in the '''Start''' and '''End''' columns as shown below. | |||
Hit '''Apply/Save''' to commit your changes. | Hit '''Apply/Save''' to commit your changes. | ||
[[File:5Port_Specification.PNG| Specifying details of Port Forward Rule]] | |||
[[File:5Port_Specification.PNG|800px|Specifying details of Port Forward Rule]] | |||
===Power Cycle=== | ===Power Cycle=== | ||
It | It is recommended that you power your modem off, waiting about 5 seconds and power it back on after making these changes. | ||
'''Notes:''' | '''Notes:''' | ||
*The modem should retain these | *The modem should retain these port forward settings when powered off or when rebooted. | ||
*Rules can be manually edited later to amend them. | *Rules can be manually edited later to amend them. | ||
*A "factory reset" of the modem to default settings (by putting a pin in the hole on the back of the modem for 20 seconds) will eliminate all port forwards set up. | *A "factory reset" of the modem to default settings (by putting a pin in the hole on the back of the modem for 20 seconds) will eliminate all port forwards set up. | ||
Revision as of 15:09, 24 January 2018
Port forwarding allows you to sign into a local computer network from outside, via the internet and carry out tasks on the network, such as editing documents, changing configurations or printing.
To accomplish this your DSL modem has to be manually configured to allow port forwarding.
Caution
Port forwarding has distinct security implications and should not be undertaken unless you understand that you are opening your local area network to the open internet. You need to either control access or understand what you have opened access to.
Port forwarding on SmartRG Modems
Setting up port forwarding on a SmartRG SR505N
1. Sign into your modem by logging in to the IP 192.168.1.1 and go to → Manage Gateway (Advanced) and enter your modem's login (usually admin for username and your DSL password for the password).
Assigned Static IPs to Devices on your Local Area Network
To open up ports for a particular service you're using, we first have to specify which devices on your local network should be accessible over those ports.
2. Click on the Device Info Menu Link and go to → the submenu DHCP
Copy the MAC Address for the device(s) you want to open up ports for and paste it in a text editor.
3. Click on Advanced Setup → then LAN Submenu →
Locate the DHCP Server Range from as indicated in the diagram below (usually 192.168.1.2 to 254) and click on Add Entries under the Static IP Lease List table
4. On the DHCP Static IP Lease page, Paste the MAC address for the devices you choose is Step 2 and assign a Static IP from the range note in Step 3
Creating Port Forwarding Rule
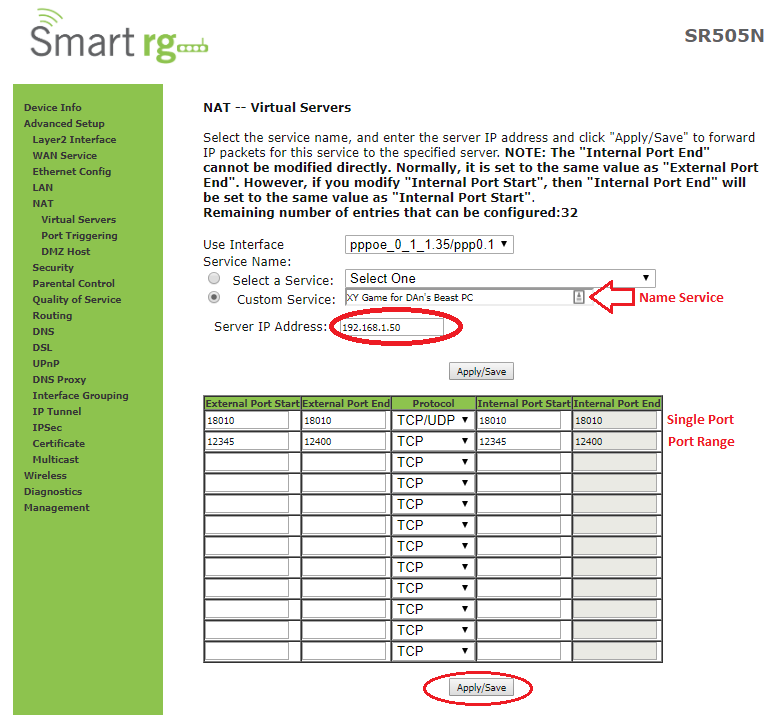
5. Click on NAT under the Advanced Setup menu and select Add under the Virtual Servers Setup page
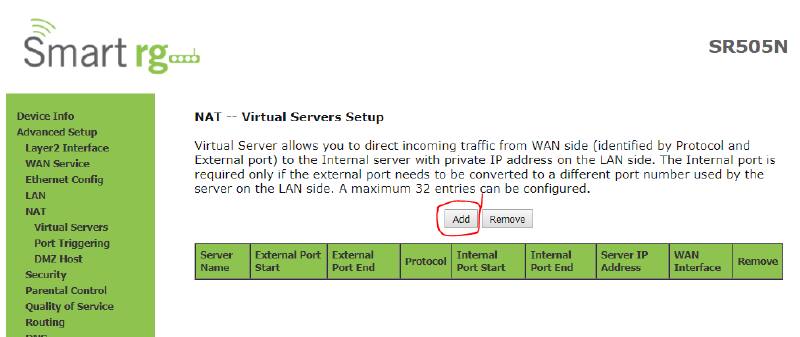
6. Select Custom Service. Set a descriptive service name (one that reminds you of what service is using the ports and what device on your local network it's being open for).
Enter the Static IP address assigned in Step 4.
Enter the Port Needs in the External Port Start and End fields on the table and specify the Protocol type.
A single port must be repeated in the Start and End columns as shown below.
Hit Apply/Save to commit your changes.
Power Cycle
It is recommended that you power your modem off, waiting about 5 seconds and power it back on after making these changes.
Notes:
- The modem should retain these port forward settings when powered off or when rebooted.
- Rules can be manually edited later to amend them.
- A "factory reset" of the modem to default settings (by putting a pin in the hole on the back of the modem for 20 seconds) will eliminate all port forwards set up.
Port forwarding on TP-Link modems
Setting up port forwarding on TP-Link 8816, 8901, 8951, and 8961 model modems is a relatively simple task.
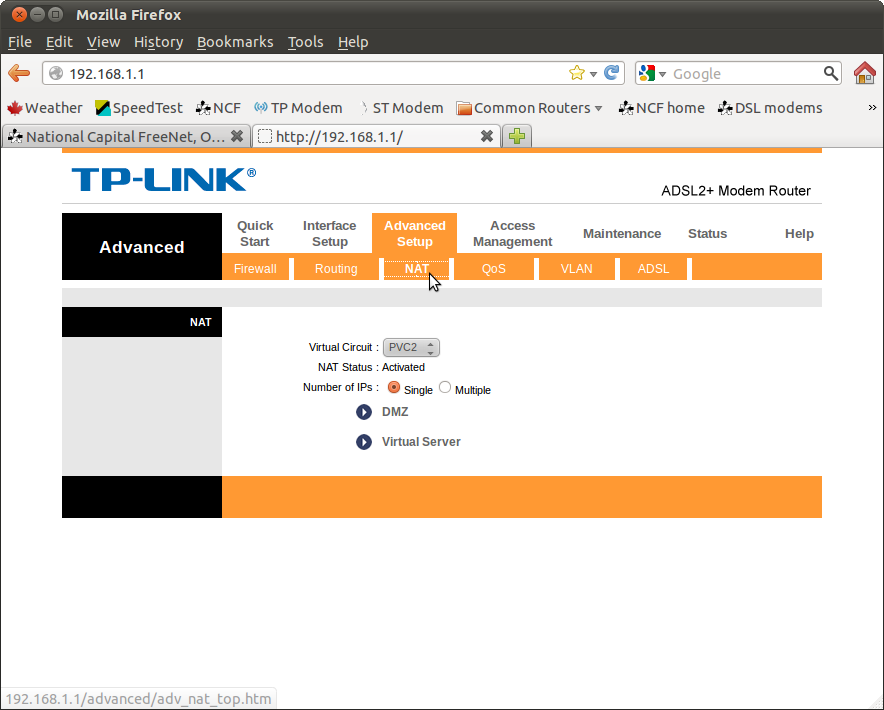
1. Sign into your DSL modem web interface and go to Advanced Setup → NAT.
2. Select a new Virtual Circuit.
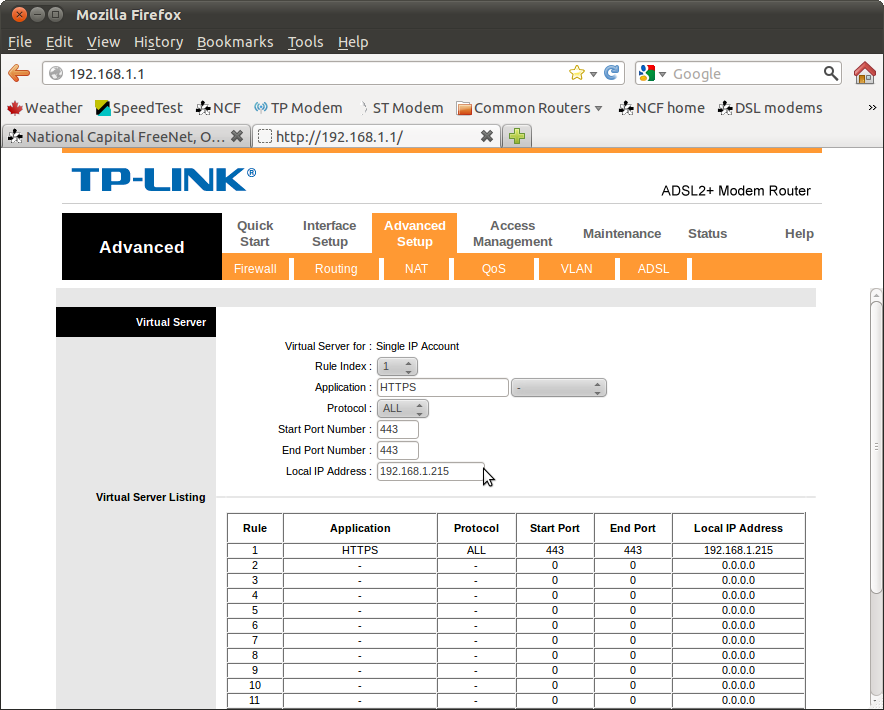
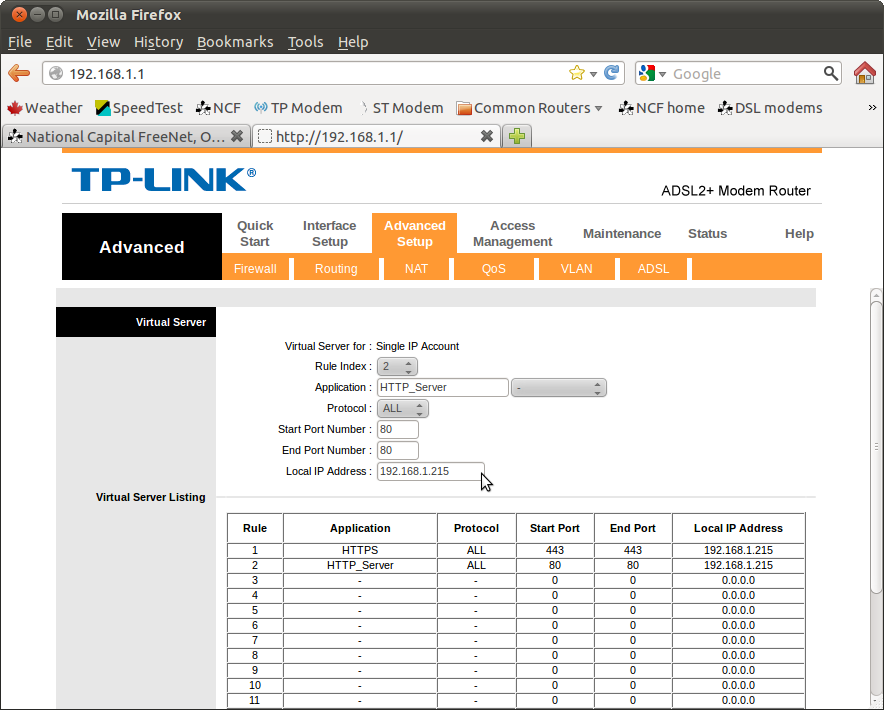
3. Set the rule index to "1" to establish the first rule.
4. Set a name for the application under "Application" (Note: you can choose suggestions from the pull down menu or enter your own name for it manually).
5. Set the port(s) to be opened from "Start port number" and "End port number". (Note: if the same port number is designated under "start" and "end" then only that port will be opened.
6. Set the local IP address of the destination under "Local IP address".
7. Continue to set further rules, if required. These will all appear on the virtual server listing.
Notes:
- The modem will retain these forwards when powered off or when rebooted.
- Rules can be manually edited later to amend them.
- A "factory reset" of the modem to default settings (by putting a pin in the hole on the back of the modem for 20 seconds) will eliminate all port forwards set up.
See also
External links
- More Comprehensive Guide for TD-W8951ND Port Forwarding on PortForward.com
- Port Forwarding on Wikipedia
- Basic explanation of Port Forwarding on Simple English Wikipedia

